
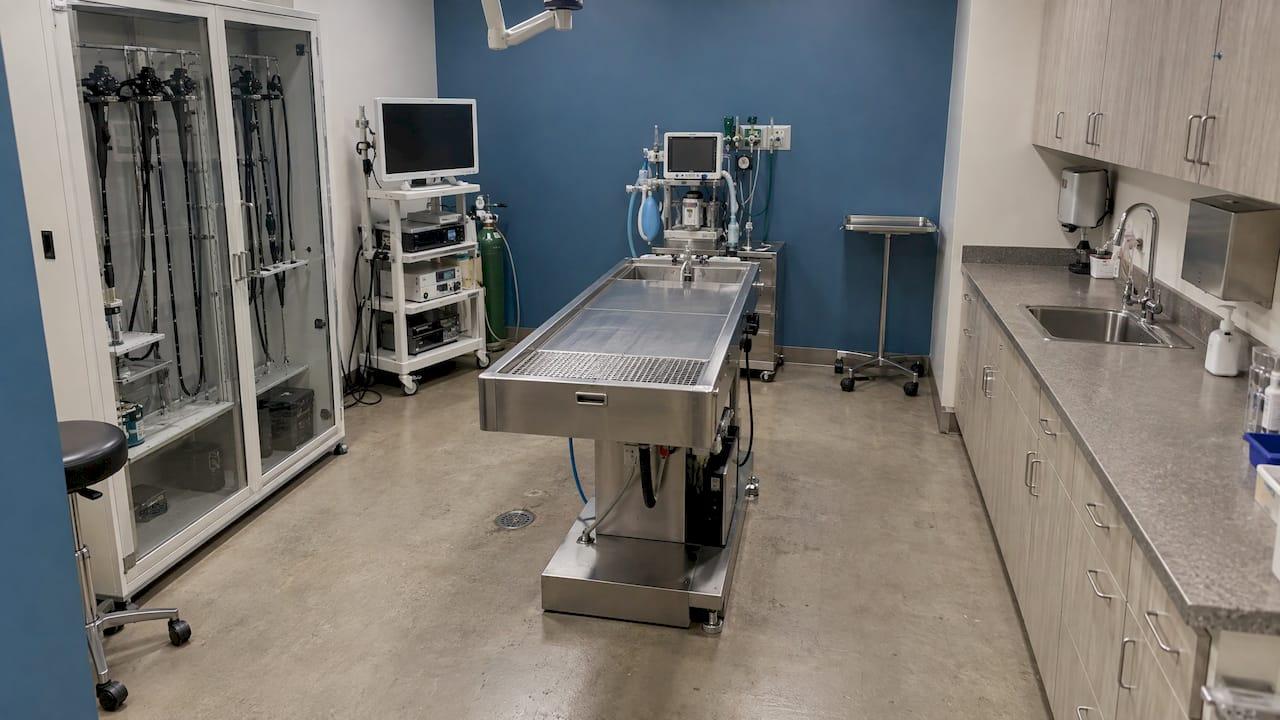
A workable veterinary endoscopy room fits in 10 × 10 feet, and 10 × 12 feet gives you noticeably better circulation and equipment storage, according to veterinary architect Paul Gladysz in Today's Veterinary Business. The layout that earns its keep puts the table on a peninsula, keeps scope reprocessing and image review out of the procedure room, and gives every scope a vented place to hang. This guide walks through the room, then the equipment that goes in it.
TL;DR
- Plan for 10 × 12 feet if you can. 10 × 10 feet works, but 10 × 12 feet leaves room to move around the patient and the tower.
- Use a peninsula: counters and cabinets along the walls, with the table projecting out so staff can work at either end of the patient.
- Move scope washing, documentation, induction and recovery out of the room, so the room handles only the procedure.
- Specify dimmable LED lighting, oxygen, anesthesia-gas venting, an in-room handwash sink and a separate exhaust fan near the table end.
- Hang flexible scopes in tall vented cabinets. A cabinet 8 inches deep and 24 inches wide holds up to three scopes.
Table of Contents
- Decide first: dedicated room or shared space
- What the room should and should not do
- Room size: 10 × 10 or 10 × 12 feet
- Table placement: the peninsula layout
- Fixtures and features the room needs
- Planning for clean and dirty flow
- Special cases: arthroscopy, recording and small animal work
- Layout checklist
- Local codes and requirements
- Perspective
- Equip the room
- FAQ
- Sources
Decide first: dedicated room or shared space
Before you draw anything, settle what the room is for. A veterinary endoscopy room can be dedicated to endoscopy or shared with other procedures. The same Today's Veterinary Business piece notes that endoscopy can sit farther from the main treatment area, as long as staff can reach it easily and the room takes a gurney.
The answer usually comes down to caseload:
- A few procedures a week: a multipurpose room, with the scope tower on a cart that rolls in and out, is a reasonable start. Keep the room's cabinets and outlets planned for endoscopy even if the room has a second job.
- Regular GI, airway, urinary or rhinoscopy work: a dedicated room pays off, because the tower, light source, insufflation and recording gear stay set up and ready.
- Mixed small animal and equine work: the room for small animals and the field or stall-side setup for horses are different problems. Large animal work often happens where the horse is, so the cart matters more than the room. Our guide to large animal endoscopy carts covers that side.
If you are still deciding what to put in the room, start with which endoscope a veterinary clinic should buy first, because the first scope sets the tower, the storage and the power you need.
What the room should and should not do
A room that does too much becomes a bottleneck. Gladysz suggests moving several tasks out of the procedure room to free its capacity: scope washing, image review and documentation, induction and recovery.
In practice that gives you four zones across the clinic:
| Task | Where it belongs | Why |
|---|---|---|
| Induction and prep | Treatment area or prep space | Keeps anesthesia lead time off the procedure room |
| Procedure | Endoscopy room | Only the people, table and equipment the case needs |
| Scope reprocessing | Separate cleaning area | Separates dirty scopes from the clean field |
| Recovery and records | Recovery area, a workstation elsewhere | Frees the room for the next case |
The room still needs a data-input workstation for the procedure itself, so the team can capture findings and images as they work. The longer review and reporting can move to a quieter desk.
The U.S. Department of Veterans Affairs digestive endoscopy service design guide takes the same approach for human hospitals: patients enter from prep and recovery, and a separate service route leads to decontamination and reprocessing. It is a human-healthcare document, not a veterinary rule, but it shows the logic of keeping the patient route and the dirty-scope route apart. You can borrow that principle at any scale.
Room size: 10 × 10 or 10 × 12 feet
Gladysz's figures are the clearest dimensions available for a veterinary endoscopy room. A 10 × 10 foot room is workable. A 10 × 12 foot room allows better circulation and equipment storage.
The extra two feet matters more than it sounds. In a 10 × 10 room, a table, a tower, a handwash sink and a cabinet run consume most of the floor, and the person holding the scope has little room to step back. With 10 × 12 feet you can leave a clear path around one end of the table, park a gurney, and keep the tower where the endoscopist can see the monitor without twisting.
Two checks save grief later:
- Tape the room out. Mark the table, tower, cabinet and sink footprints on the floor of the proposed space and walk a mock procedure with the whole team.
- Include the gurney. If patients arrive and leave on a gurney, it needs a turning path, not just a parking spot.
If the budget for the build-out is the constraint, a veterinary practice financing guide explains how clinics approach equipment and expansion funding.
Table placement: the peninsula layout
Gladysz recommends a peninsula: counters and cabinets along the walls, with the exam table projecting out from them. The reason is simple. Staff commonly work at one end of the patient, so the table needs free space on at least the head or tail end and access from the sides.
Here is how that plays out:
- Head end: the endoscopist and the person handling the scope stand here for upper GI, airway and oral work. Keep this end open.
- Tail end: colonoscopy and cystoscopy work happens here, so this end needs the same clearance.
- Side: the anesthetist or technician needs access to the monitoring gear and anesthesia machine without crossing the scope's path.
- Back wall: counters, cabinets and the sink, so supplies are an arm's length from the field.
Place the tower and monitor so the endoscopist looks straight ahead at the screen, not over a shoulder. A cart on locking wheels lets you shift the tower to whichever end of the patient is in use.
Fixtures and features the room needs
The 2019 design guidance lists a clear set of fixtures.
Table and sink
A wet-tub table handles the fluids, irrigation and mess common in endoscopic work. An in-room handwash sink keeps hand hygiene at the point of use, so no one walks out mid-procedure.

Cabinets and counters
Plan ample counter space for accessories, forceps, valves, tubing and syringes. Tall vented cabinets with scope hooks hold flexible scopes hanging straight. According to the same guidance, a cabinet 8 inches deep by 24 inches wide is enough for up to three scopes. That is a small footprint, which is why a modest room can still store a working set.
If you want more on how to keep scopes between uses, see our guide on how to store endoscopic equipment.
Lighting
Dimmable ceiling LED lighting lets you bring the room up for setup and cleanup, then drop it so the monitor image reads clearly during the procedure. Avoid glare on the screen by keeping fixtures out of the monitor's line of sight.
Gases, venting and odor
The recommendations include an oxygen supply, venting for anesthesia gas, and a separate exhaust fan near the end of the table for odor control. Odor from GI and colonic work is real, and an exhaust placed near where the work happens deals with it at the source. Waste anesthetic gas venting also protects staff who spend hours in the room, so it belongs in the plan from the start, not as an add-on.
Power and data
Count your devices before you count outlets: video tower or portable monitor, light source, insufflator or pump, recording device, anesthesia monitor and workstation. Place outlets above counter height and at the table end of the room so cords do not cross the floor where people walk. Data ports at the workstation support image capture and records.
Planning for clean and dirty flow
The room's biggest infection-control feature is what is not in it: the dirty scope sink. Reprocessing in a separate area means a used scope leaves the room in a closed container or tray and never crosses the clean field.
The 2012 Today's Veterinary Practice article on endoscopic equipment lays out the care routine the layout should support:
- Follow the manufacturer's instructions for your scope.
- Leak-test before and after procedures.
- Wipe the insertion tube and flush channels promptly after use.
- Clean thoroughly, brushing channels, then rinse and dry.
- Hang flexible scopes for storage.
Each step needs a surface, a sink or a hook. Walk the route from the table to the reprocessing area to the storage cabinet and check that nothing dirty crosses something clean. Our step-by-step endoscope sterilization guide and the 2026 sterilization guide go deeper on the cleaning chemistry and routines.
Equine airway work and contamination
If your clinic scopes horses, the layout also affects contamination risk. A 2023 study in the Journal of Veterinary Internal Medicine on high-level disinfection of endoscopes found scopes culture-negative after the tested disinfection procedures, while qPCR stayed positive in some samples. The authors cautioned that DNA contamination can produce false-positive S. equi qPCR results. They also point to environmental contamination and errors by reprocessing staff as contributors to contamination after disinfection, and advise caution when scoping several horses after an outbreak, especially if scopes cannot be tested between horses.
The layout lesson: give reprocessing its own clean, uncluttered space, away from where airway samples are handled. Our article on equine airway endoscopy equipment and qPCR false positives covers the equipment side.
Special cases: arthroscopy, recording and small animal work
An endoscopy room often doubles for other minimally invasive work. Arthroscopy adds fluids, drapes and a sterile field, so it asks more of the space. Our veterinary arthroscopy setup guide covers the equipment, room and fluids for it.
If you record procedures for records or referral, plan the recording gear as part of the workstation. Footage that is lost because a device was unplugged or full is a layout and workflow problem, and our 1080p endoscopy recording workflows guide shows how to prevent it. For small animal workflows in the room, see these small animal endoscopy tips.
Layout checklist
Use this before you finalize a plan.
- Room is 10 × 10 feet at minimum, 10 × 12 feet if space allows.
- Table sits on a peninsula with clear access at the head and tail ends.
- Gurney can enter, turn and leave.
- Wet-tub table and in-room handwash sink are in the plan.
- Tall vented cabinets with scope hooks are sized for your scopes: 8 inches deep by 24 inches wide holds up to three.
- Counters are ample, with outlets above counter height.
- Ceiling LEDs are dimmable, and the monitor is clear of glare.
- Oxygen and anesthesia-gas venting are in place, with an exhaust fan near the table end.
- Scope washing, documentation, induction and recovery sit outside the room.
- Routes for patients, dirty scopes and clean scopes do not cross.
Local codes and requirements
Room dimensions are design advice, not law. Building, plumbing, electrical and ventilation requirements come from your state and local building codes and the authority that inspects your project, and occupational safety rules apply to staff who work around anesthetic gases. Confirm the current requirements for your jurisdiction with your local building department and your state veterinary board before construction, because they vary by place and change over time. The AAHA hospital design guide covers the wider hospital picture and support spaces, though it does not give endoscopy-room dimensions.
Perspective
Most clinics we talk to ask about the room after they have already bought a scope. We would flip that order. The scope decides the tower, the cart, the cabinet and the power, so the room is easier to plan once you know what will live in it.
We build our range around portability. A fully portable scope with a direct monitor and SD card recording can work in a 10 × 10 foot room, on a cart in a treatment area or stall-side with a horse. That keeps your room plan flexible, because the equipment does not demand a fixed, expensive installation.
We also see the room as part of a system: scopes, light sources, pumps, valves, cleaning tools and biopsy forceps that fit together. Planning the accessories alongside the room means the counters and cabinets match what you will use. Our aim is high-quality veterinary endoscopy at prices a clinic can justify, with support when you need it and repairs for the scopes you already own.
Endoscope
Equip the room
Once the room is planned, fill it with gear that fits. We offer veterinary endoscopy equipment and scopes, rigid scopes, arthroscopes and otoscopes, flexible biopsy forceps, and endoscopic accessories along with the Portascope line. For airway work, the fully portable 6mm × 150 airway inspection direct monitor SD card system is a compact starting point, and our repair service keeps scopes you already own in use. Our positioning is affordable, portable veterinary-specific equipment with 24/7 support and rapid shipping.
To see the scopes in use and the cleaning routines, watch our PortaScope operation and cleaning videos.
FAQ
How big should a veterinary endoscopy room be?
A 10 × 10 foot room is workable. A 10 × 12 foot room allows better circulation and equipment storage, according to Gladysz's 2019 guidance. Choose the larger size if you will use a gurney or a full tower.
Does endoscopy need its own room?
Not necessarily. The room can be dedicated or multipurpose, and it can be farther from the treatment area if staff can reach it and a gurney fits. A dedicated room makes sense when you run endoscopy regularly and want the equipment set up and ready.
Where should scope cleaning happen?
Outside the procedure room, in a separate reprocessing area. Moving scope washing out frees the room's capacity and keeps used scopes away from the clean field. Follow your scope manufacturer's instructions for cleaning and leak testing.
How many scopes fit in one cabinet?
A tall vented cabinet 8 inches deep and 24 inches wide is sufficient for up to three scopes, hung on hooks. Size cabinets for the scopes you own today plus the next one you plan to add.
What utilities does the room need?
Plan for dimmable ceiling LED lighting, an oxygen supply, venting for anesthesia gas, an in-room handwash sink and a separate exhaust fan near the end of the table for odor control. Add enough outlets and data ports for the tower, light source, recorder and workstation.
Sources
- Inside Information, Today's Veterinary Business (2019)
- Digestive Diseases Endoscopy Service Design Guide, U.S. Department of Veterans Affairs (2011)
- Endoscopic Equipment for the Veterinary Practitioner, Today's Veterinary Practice (2012)
- Efficacy of high-level disinfection of endoscopes, Journal of Veterinary Internal Medicine (2023)
- Animal Hospital Design Strategies for Better Care, AAHA (2021)
- Veterinary Practice Financing: Vet Practice Loan Guide