

The most reliable setup for clinics and field inspectors is portable HD capture, either an on-board SD/USB recorder or a compact external capture device, paired with a standardized recording routine and immediate backup. This beats chasing hospital-grade DICOM integration for most practices. Before buying anything, confirm your scope's video output and check how much storage you actually have on hand with trusted veterinary SEO services that help clinics grow by sharing educational media effectively.
TL;DR:
- Portable SD and USB recorders provide the most reliable and straightforward solution for clinics and mobile inspectors, avoiding hospital-grade integrations.
- Ensuring compatibility with your scope's actual video output and minimum specs like 1080p resolution at 60fps is crucial for quality documentation.
- Recording procedures should start before insertion, include clear narration, and be backed up immediately to prevent footage loss or corruption.
- MP4 formats with basic storage are sufficient for most clinics, while DICOM is mainly necessary for large hospitals with existing imaging systems.
- Choosing the right system depends on caseload, hardware fit, workflow simplicity, and support, with hybrid backup strategies recommended for data security.
Table of Contents
- What Types of Endoscopy Recording Systems Exist?
- What Hardware and Image Specs Do You Need?
- How Should You Record During a Procedure or Inspection?
- MP4, DICOM, or Both: Which Format and Storage Setup Makes Sense?
- What Compliance and Data Security Steps Do Veterinary Programs Need?
- How Do You Choose the Right Recording System?
- Quick Setup and Troubleshooting Checklist
- Why Workflow Matters More Than Specs
- How 1800endoscope Can Help You Choose the Right Setup
- Sources
- FAQ
What Types of Endoscopy Recording Systems Exist?
Four categories cover almost every clinic and inspection setup. On-board SD/SSD recorders live inside the scope handle or processor and write files directly to a removable card, which makes them the simplest option for solo practitioners and mobile inspectors. External data capture devices (DCDs) sit between your scope and a monitor, converting video output into a recordable stream, useful when your existing scope has no built-in recording.
PC capture setups route video through a capture card into a laptop or workstation, giving you more editing horsepower at the cost of a less portable rig. Cloud-based platforms upload footage automatically and offer remote access and AI-assisted editing tools, but they depend on steady connectivity that many field sites and rural clinics don't have.
- On-board SD/SSD: best for mobile vets, ambulatory equine work, and single-scope clinics
- External DCDs: best when retrofitting an older scope that lacks native recording
- PC capture: best for high-throughput procedure rooms doing heavy post-editing
- Cloud platforms: best for multi-site practices needing remote review, if bandwidth allows
Most independent clinics and industrial techs get more done with SD-based recorders because there's no subscription, no upload wait, and no dependence on a signal.
What Hardware and Image Specs Do You Need?
Start with your scope's actual video output. Older processors often use DVI or composite, while newer videoscopes and borescopes typically output HDMI or USB-C, and many industrial units record straight to SD card without needing an external device at all.
Minimum viable specs for reliable documentation:
- Resolution: 1080p HD is the practical floor for diagnostic-quality footage, based on veterinary recording guidance
- Frame rate: 60fps when motion fidelity matters, such as laryngeal function or moving industrial machinery
- Overlay data: patient or job ID and timestamp burned into the footage, not just filed separately
- Snapshot function: the ability to grab a still without breaking the recording, though some industrial models use a freeze-frame function instead, which briefly pauses the feed
- Audio input: narration capability for annotating landmarks in real time
- Storage capacity: enough headroom for a full day's caseload without swapping cards mid-shift
Pro Tip: Check your scope's manual for its actual output resolution before buying a recorder. A 1080p-rated recorder paired with a 480p scope output won't magically upgrade your footage.
Battery life matters more for field inspectors than clinic staff. A borescope running continuous SD recording in a pipe inspection can drain a battery mid-job if you don't check charge levels beforehand.
How Should You Record During a Procedure or Inspection?
Rejected footage almost always traces back to procedure, not hardware. Follow this sequence to cut down on wasted recordings:
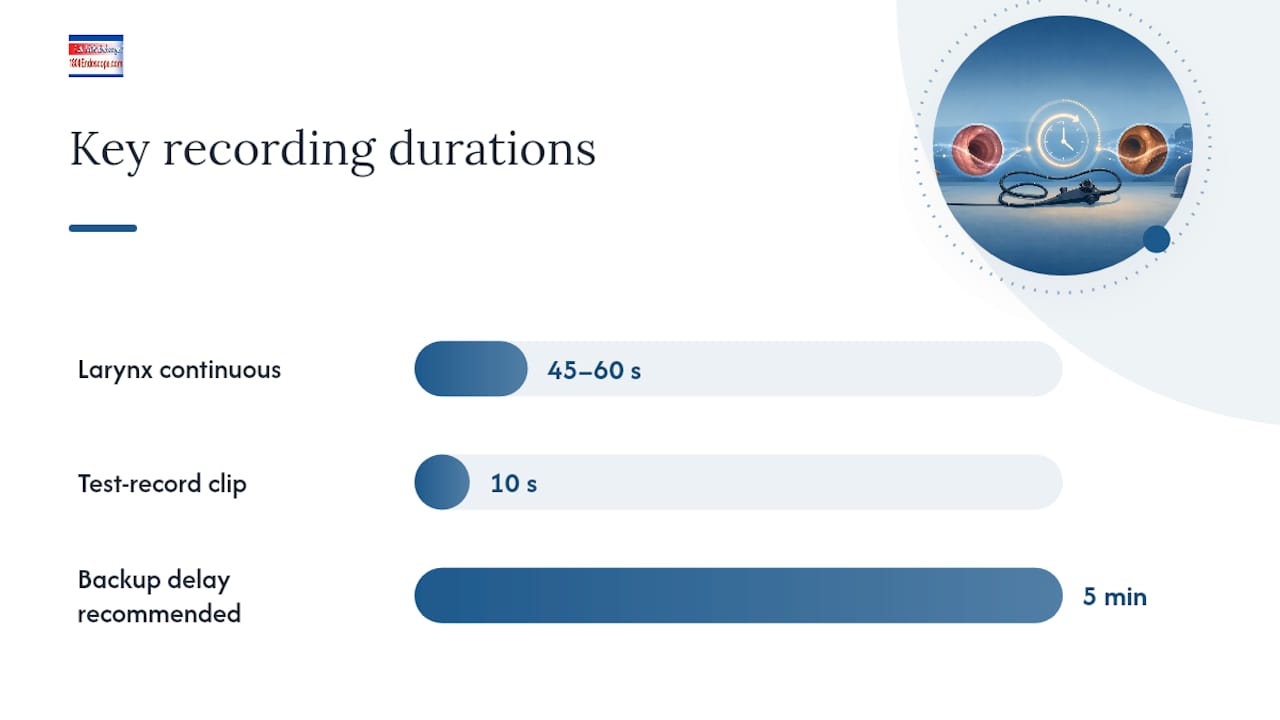
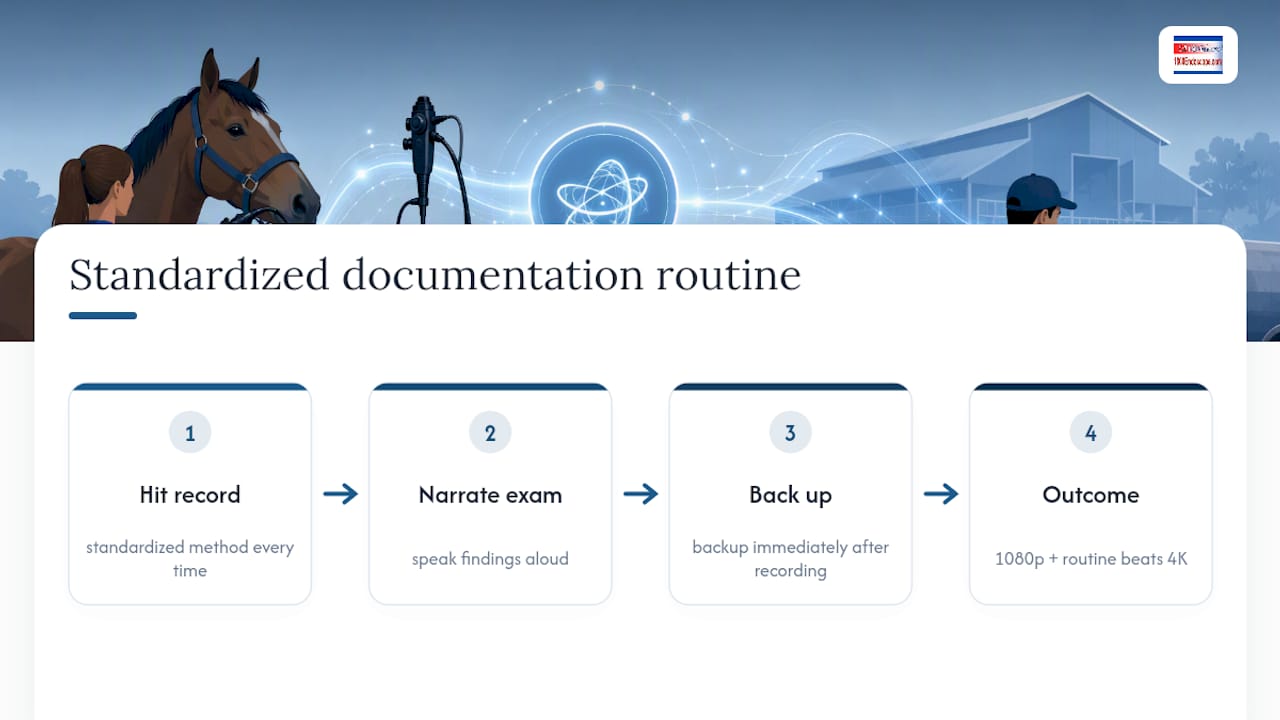
- Start recording before insertion. Hit record while the scope is still outside the patient or pipe, and don't stop until it's fully withdrawn. Continuous, unbroken footage is non-negotiable for certain use cases.
- Narrate key landmarks out loud. Say what you're looking at as you see it. This turns a silent clip into something a second reviewer can actually use.
- Hold steady on critical structures. For equine pre-sale exams, the AAEP protocol requires continuous, unbroken footage of the larynx for 45 to 60 seconds. Cutting away early invalidates the exam.
- Test-record a 10-second clip first. Check exposure and white balance before committing to the full procedure.
- Reduce light intensity if the image looks washed out. A modest drop in light source output preserves mucosal color and surface detail that overexposure erases.
- Standardize file names immediately. Use a consistent pattern (date, patient ID, procedure type) rather than relying on memory later.
- Back up the file before you move to the next case. A five-minute delay here is cheaper than losing footage to a corrupted card.
Pro Tip: Rushing the annotation step is the most common cause of unusable footage. A well-narrated recording at 1080p beats a silent 4K clip every time a second clinician needs to review it.
Small animal procedures follow the same logic at a smaller scale. Matching scope size to the patient reduces the chance of an interrupted exam caused by discomfort or repositioning.
MP4, DICOM, or Both: Which Format and Storage Setup Makes Sense?
Most clinics don't need DICOM. MP4 with H.264 or H.265 compression handles the vast majority of veterinary and industrial documentation needs, plays on any device, and takes up far less storage than uncompressed formats. DICOM only earns its complexity when you're feeding a PACS or VNA system that indexes footage alongside other diagnostic imaging and pulls metadata straight from an EHR.
| Approach | Best for | Tradeoff |
|---|---|---|
| MP4 local | Solo clinics, field inspectors, most caseloads | No automatic EHR indexing |
| DICOM + PACS/VNA | Large hospitals with existing imaging infrastructure | Higher cost, more IT overhead |
| Cloud backup (encrypted) | Multi-site practices, remote review needs | Depends on connectivity, recurring fees |
| Hybrid local + cloud | Practices wanting both speed and redundancy | Requires a backup routine to actually happen |
The safest strategy for most readers of this guide is hybrid: keep the original, unedited file on a local SSD or SD card, then push an encrypted copy to cloud storage on a schedule. Cloud-based systems simplify remote access and automated backup, but clinics with unreliable bandwidth should treat cloud as a backup layer, not the primary recording destination. Never edit or compress your only copy of an evidentiary recording. Preserve the original and make edited or training copies separately.
What Compliance and Data Security Steps Do Veterinary Programs Need?
Documentation compliance in veterinary work usually comes down to one protocol: AAEP's pre-sale equine exam standard, which requires continuous larynx footage for 45 to 60 seconds with no cuts. Auction buyers and sellers rely on this footage as evidence, so a broken recording can invalidate the entire exam.
Security doesn't need to be complicated for most practices, but it does need to be deliberate:
- Encrypt exported files before they leave the clinic, especially client-facing copies
- Restrict access to recordings on shared drives or cloud folders
- Avoid handing off loose, unencrypted USB drives as your only transfer method
- Tag files with patient ID and timestamp at the point of recording, not after the fact
DICOM and EHR integration make sense for large equine hospitals running high case volumes across multiple locations. For a single-doctor clinic or a field inspection team, that infrastructure is usually overkill. The recurring pitfalls worth watching for are interrupted recordings, missing ID overlays, and exports that go out unencrypted, all of which undermine footage that would otherwise hold up as documentation.
How Do You Choose the Right Recording System?
Start with your actual caseload, not the flashiest spec sheet. A clinic doing three scopings a week has very different storage and battery needs than an equine practice recording pre-sale exams daily.
- Match device to throughput. Higher case volume means you need larger storage and possibly a spare battery on hand.
- Confirm mechanical fit first. Check the scope's outer diameter, working length, and video output type against the recorder before ordering anything.
- Ask the vendor directly about compatibility. A quick compatibility check on connectors and adapters saves a return shipment later.
- Prioritize fast workflow features. Single-button recording and quick ID entry cut down on the friction that causes staff to skip documentation altogether.
- Check export options before you commit. A recorder that's a hassle to pull footage from will get used less over time, regardless of image quality.
- Ask about support and repair. Confirm warranty terms and whether repair services are available if the unit fails mid-caseload.
Reviewing a cost breakdown for veterinary endoscope purchases before you shop helps set realistic expectations for what a compatible, recorder-ready setup actually runs.
Quick Setup and Troubleshooting Checklist
Most lost recordings come down to a handful of predictable causes. Run through this before every session:
- Before the procedure: inspect the scope tip, power on the capture device, verify storage space and battery charge, set the ID overlay, and run a 10-second test recording.
- During the procedure: watch the live feed for overexposure and dial down light intensity if the image washes out. Avoid pausing and restarting, which splits footage into separate files.
- If recording stops unexpectedly: check remaining storage first, then confirm the cable is fully seated, and check whether the device's sleep or standby setting kicked in mid-session.
- After the procedure: play back the file to confirm it recorded properly, then back it up immediately rather than waiting until end of day.
A troubleshooting reference on hand at the workstation saves time when something goes wrong mid-caseload.
Why Workflow Matters More Than Specs
Most clinics don't fail at recording because their hardware falls short. They fail because nobody standardized how the team hits record, narrates, or backs up footage. A 4K scope in the hands of a rushed technician produces worse documentation than a 1080p unit used by someone who follows the same routine every time.
Adoption comes down to whether the system is simple enough that staff actually use it consistently, not whether it has the most impressive spec sheet. That's why step-by-step setup guides and hands-on training matter as much as the hardware itself. Clinics that build a five-minute training habit around recording tend to produce more usable footage than ones that just hand new staff a manual.
If your team needs help matching a scope's output to a compatible recorder, reach out for a compatibility check before you buy.
— Endoscope
How 1800endoscope Can Help You Choose the Right Setup
Whether you're outfitting a small animal clinic, an equine practice, or an industrial inspection crew, the right recording setup depends on matching hardware to your actual workflow. The company carries portable SD and USB video endoscopes, along with rigid veterinary scopes and industrial borescopes designed for field and shop conditions rather than hospital budgets.

The PVSM6150 portable airway inspection system is a good example of what a recorder-ready setup looks like out of the box: direct SD-card recording, no external capture device required, and a form factor built for ambulatory equine work. For clinics that need rigid options alongside flexible scopes, the rigid veterinary endoscopy catalog covers arthroscopes and otoscopes that pair with standard recording accessories. Industrial technicians can browse borescopes built for pipe and equipment inspection with SD-card recording built in.
Not sure which scope and recorder combination fits your caseload? Browse the medical and veterinary endoscope catalog or reach out for a compatibility check before you order, so you're not stuck adapting mismatched hardware after the fact.
Sources
- Video recording in GI endoscopy (review)
- Protocol for pre‑sale videoendoscopic examination of the upper airway at public auction
FAQ
What Is the Minimum Video Resolution for Endoscopy Recording?
1080p HD is the practical floor for diagnostic-quality footage, based on veterinary recording standards. Use 60fps when recording fast-moving structures like the larynx or moving industrial parts.
How Long Must Larynx Footage Be for Equine Pre-Sale Exams?
The AAEP protocol requires continuous, unbroken larynx footage for 45 to 60 seconds during pre-sale upper airway exams. Cutting away before that window closes invalidates the documentation.
Should I Use MP4 or DICOM for Endoscopy Recordings?
MP4 compression handles most clinic and field inspection needs without added cost or complexity. DICOM only makes sense if you're integrating with an existing PACS or VNA system at a larger hospital.
Does 1800endoscope Sell Recorder-Ready Endoscopes?
Yes, the company carries portable SD and USB video endoscopes with built-in recording, including the PVSM6150 airway inspection system. Pricing and specifications can be found on the product page.
What Causes Recordings to Stop Unexpectedly Mid-Procedure?
The most common causes are full storage, a loose cable connection, or a device sleep setting triggering mid-session. Check all three before assuming the hardware has failed.