
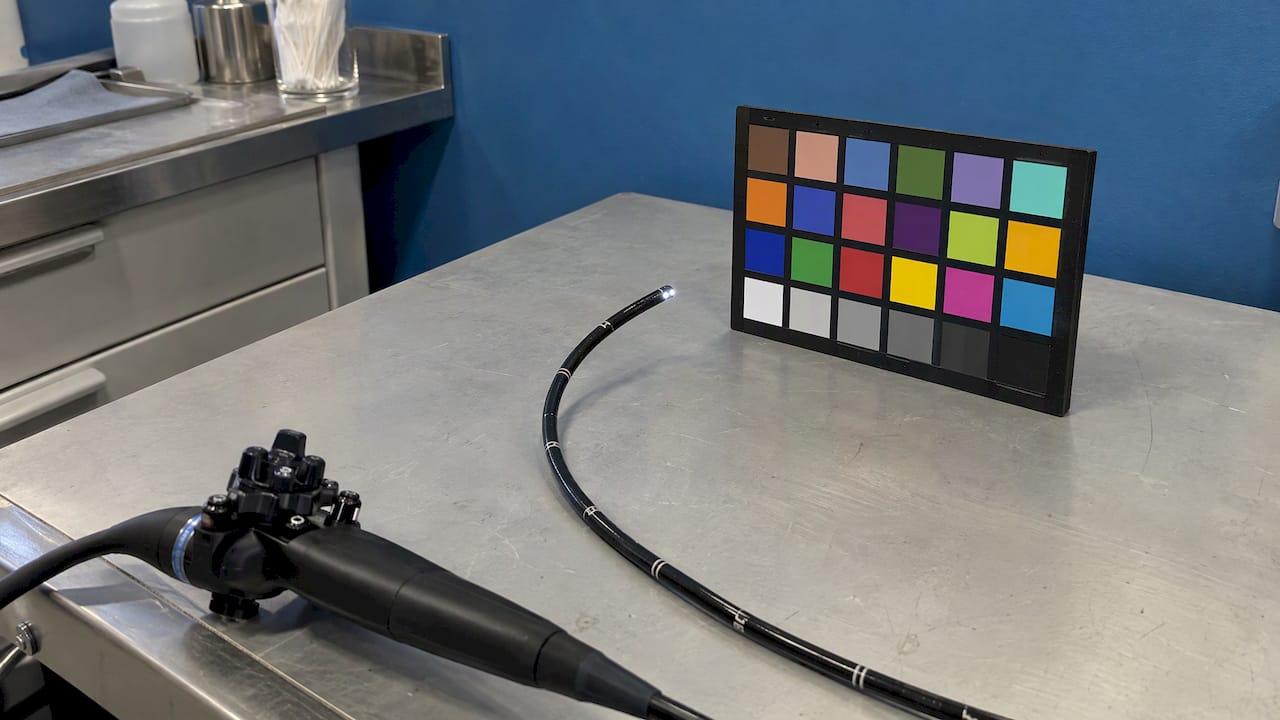
Endoscope color rendering is how faithfully, and how consistently, the whole imaging chain turns the colors inside a cavity, airway or pipe into the colors on your screen. That chain is the scope, the light source, the video processor and the display. For a veterinarian or inspection technician, the practical goal is not perfect color in the abstract. It is a repeatable image, so a pink mucosa, a rust stain or a weld discoloration looks the same from one exam to the next. This guide shows what changes color, how it is measured, and how to set up a portable system so you can trust what you see.
TL;DR
- Color in an endoscope image is the product of three cascaded parts: the scope with its sensor, lens and light, the video processor, and the display. Change any one and the colors change.
- Absolute color accuracy is rarely the goal. Most endoscopes do not try to reproduce the original color faithfully, so consistency and good setup matter more.
- Light source, white balance and a fixed display setup are the three things you control every day.
- Enhancement modes exist because color contrast helps people see lesions, and published GI research shows measurable gains in visibility.
- We build our veterinary and industrial systems around portable, high-resolution video, with accessories and repair support under one roof.
Table of Contents
- What color rendering means in an endoscope
- The imaging chain: where color changes
- Why systems never match perfectly
- How color performance is measured
- Enhancement modes: color rendering changed on purpose
- What this means in a veterinary exam
- What this means in industrial inspection
- A routine for consistent color
- Questions to ask when comparing scopes
- Our perspective
- Choosing a system that keeps color consistent
- FAQ
- Sources
What color rendering means in an endoscope
A camera in a phone is judged partly on whether photos look pleasing. An endoscope is judged on whether the image helps you decide something: is this tissue inflamed, is that residue blood, has this surface corroded. Color carries that information. In human gastroenterology, color information gives the endoscopist clues to the nature of a lesion and a site to biopsy, and the same logic applies when you look at an airway, a nasal passage, a joint or the inside of a turbine housing.
It helps to separate four ideas that a 2014 consensus report on color in medical imaging distinguishes: color reproducibility, color consistency, color characterization and color standardization. In plain terms:
- Reproducibility is how closely the image matches the real object.
- Consistency is whether the same object looks the same on different days, with different operators or different units.
- Characterization is knowing how your device actually behaves, for example through a test chart.
- Standardization is agreeing on a common reference so devices can be compared.
For a clinic or inspection shop, consistency is the one you can act on. If your images always render a healthy surface the same way, you learn what normal looks like, and you notice when something departs from it.
The imaging chain: where color changes
A video endoscope comprises three cascaded components: the scope, including its imaging sensor, lens system and light source or light guide; the video processor; and the display. Each one leaves a fingerprint on color.

The scope: sensor, lens and light guide
The sensor converts light to signal, and its color filters decide how the red, green and blue channels are weighted. The lens and any fiber bundle change what light reaches the sensor. A 1994 IS&T/SID Color Imaging Conference paper notes that fiber optic and lens assemblies attenuate illumination and alter its spectral quality, and that marked color shifts are common. The same paper observes that many physicians trained on fiber optic systems expect a yellow cast and adjust video devices to match, which makes archived images hard to interpret later because a preferred color shift is difficult to separate from the underlying condition.
That last point matters for anyone who records video. If you tweak the color to look the way you like on Monday and reset it on Thursday, the recordings are no longer comparable.
The light source
What you see is reflected light, so the color of the illumination is the starting point. Warmer light pushes everything toward yellow and red; cooler light pushes toward blue. Brightness matters too: a dim image forces the processor to boost gain, which adds noise and shifts color. Our guides on choosing a light source for veterinary endoscopy and selecting light sources for endoscopic inspections go through output and light type in detail. For industrial work, light sources drive accuracy in endoscopic NDT because surface color and reflections are often the evidence.
The video processor and its settings
The processor applies white balance, a color matrix, gamma, sharpening and sometimes enhancement. The color reproduction of a medical camera system depends on all of these, and two units with the same sensor can look different if their processing differs. This is why a white balance step at the start of each session is not optional housekeeping. Our walkthrough on endoscope white balance covers how to do it right every time.
The display
The final link is the monitor or screen. Brightness, contrast, color temperature and viewing angle change how a perfectly good image looks. A built-in monitor on a portable unit gives you one fixed display to learn. If you route video to a second screen, check that it looks the same before you draw conclusions from it.
Why systems never match perfectly
This is not a new finding. A 1994 review of color rendition in endoscopic video systems records that researchers in 1987 described marked variations in color reproduction between direct video endoscope systems despite extensive manufacturer calibration, and that by 1992 no system tested could accurately reproduce the saturation of all the test colors.
A more recent review by Wei-Chung Cheng in the Journal of Imaging Science and Technology (2023) makes a point worth remembering: most endoscopes cannot, and do not intend to, faithfully reproduce the original color. Clinical endoscopes commonly produce absolute color errors above 20 ΔE00 (the CIEDE2000 color-difference measure), so a large absolute error does not by itself mean the instrument is inadequate. What matters is whether the system shows the differences you need to see, and shows them the same way each time.
How color performance is measured
If you want numbers instead of impressions, there is a standard approach.
Test charts and the FDA tool
The U.S. Food and Drug Administration publishes a Color Performance Review (CPR) tool for endoscopy devices. It takes measurements of a standard color test target as shown by the device, together with the known values of that target, and reports visual simulations, absolute color errors, whether the order of patches is preserved in lightness, hue and chroma, and whether color contrast between patches is preserved. The open-source implementation expects CIEXYZ measurements of the 24-patch ColorChecker plus a reference white, supplied as CSV files with 25 rows.
You are unlikely to run this in a clinic, but it shows what "good" is made of: not just how close a red is to the true red, but whether the relationships between colors survive.
Contrast matters more than a single patch
Cheng's review defines color contrast enhancement (CCE) as the degree to which a device changes the color difference between two patches. A value above 1 means the difference is increased, and high-quality endoscopy systems are expected to show CCE above 1. The same review cautions that grayscale test patterns do not represent real color performance, because tissue is rendered in pinks and reds, not gray.
For your own work, that translates into a simple habit: judge a scope on a realistic subject, not only on a black-and-white target.
Enhancement modes: color rendering changed on purpose
Some systems deliberately alter color to make findings stand out. The research here comes from human gastroenterology, but it shows why color processing is worth understanding.
- Linked color imaging (LCI) and blue laser imaging (BLI). These LASEREO features offer narrow-band-light observation and expansion or reduction of color information; LCI makes reddish mucosa redder and whitish mucosa whiter. The system uses two lasers at 410 nm and 450 nm, and LCI depicts intestinal metaplasia as lavender and diffuse redness as crimson.
- Texture and color enhancement imaging (TXI). A 2021 paper by Sato and colleagues describes TXI as combining retinex-based enhancement with color enhancement. Their experiments on animal endoscopic images showed it can brighten dark areas selectively and bring out subtle tissue differences while avoiding over-enhancement.
Does it help? In a 2017 study of early gastric cancer, LCI improved visibility in 73% of expert evaluations and 76.8% of non-expert evaluations, against 20% and 24.3% for a bright BLI mode. A network meta-analysis of 40 studies found that several image-enhanced methods, including NBI, FICE, chromoendoscopy and AFI, identified colorectal adenoma significantly better than standard-definition white light.
The takeaway for veterinary and industrial users is not that you need those specific modes. It is that color contrast is a real diagnostic tool, and that image processing is part of the instrument, not an afterthought.

What this means in a veterinary exam
A small-animal or equine endoscopy often involves wet, reflective tissue in tight, dark spaces. Three things tend to go wrong with color:
- Specular glare and wetness. Shiny surfaces blow out highlights and wash out hue. Reduce light intensity where the surface reflects it back, and keep the tip clear.
- Mixed lighting. Room lights bleeding onto an external monitor change how you perceive the image. Dim the room, or at least keep it constant.
- Changing distance. Moving closer changes brightness and the processor's gain response, so color looks different. Compare tissue at similar distances when you judge a color change.
If you record procedures for the chart or for referral, set the camera and keep it set. Our guide to optimizing endoscope video recording for vets covers recording habits, and explaining endoscope image quality goes into resolution, sensor and illumination together.
What this means in industrial inspection
In borescope work, color is evidence of heat, corrosion, contamination or coating wear. Straw-colored and blue temper tones on metal, orange rust, green copper salts and dark carbon deposits all depend on honest illumination. The main risks are a light that is too warm or too cool, a dim image that forces heavy gain, and screen settings that differ between inspectors. Agree on a single white balance routine and one display setup across the team so that reports from different technicians are comparable. In a long pipe, light falls off with distance, so color near the tip and far down the line will not match; note the distance when you record a finding.
A routine for consistent color
Use this sequence at the start of each session.
- Warm up and check the light. Let the light source reach steady output. Confirm the light guide connection is seated and the tip is clean.
- Set white balance. Point the tip at a white reference at working distance and run the balance function, as described in our white balance guide.
- Fix the display. Use the same monitor settings and the same room lighting every time. Do not adjust the screen to flatter one case.
- Record a reference frame. A short clip of the white reference at the start of a recording gives you something to compare against later.
- Judge by contrast, not absolute shade. Ask whether the difference between normal and suspect areas is clear, rather than whether the red matches a mental picture.
- Keep settings stable across a case series. If you change a setting, note it. Otherwise comparisons across weeks are unreliable.
When colors look off despite this routine, work through the checks in our animal endoscopy troubleshooting guide. Typical culprits are a soiled lens, a damaged light guide or a setting that drifted.
Questions to ask when comparing scopes
When you shop for a system, color is one part of image quality, along with resolution, field of view and light output. A few practical points:
- Look at a realistic subject. Compare scopes on real tissue or real metal surfaces, not only on a test pattern.
- Check the whole chain. The scope, the light and the display together produce the image. Ask how they are matched.
- Look at video, not stills. Processing and compression show up in motion and in recorded files.
- Think about your workflow. Portability, built-in monitors, SD card recording and wireless connectivity affect how consistently you can work from one room to the next.
Our overview of advanced videoscope features and the animal diagnostic scopes review can help you map features to your caseload.
Our perspective
We sell scopes to people who make decisions from what they see: a vet deciding whether to biopsy, a technician deciding whether a weld passes. For them, color rendering is not a specification to admire. It is a habit.
That is why we build around portable, high-resolution video systems with direct monitors and SD card recording. A scope that goes where the patient or the part is, and that records what you saw, lets you work the same way each time. The accessories matter as much: light sources, valves, pumps and cleaning tools keep the image path clean and the illumination steady.
Our aim is veterinary and industrial endoscopy at prices that do not require a hospital budget, with support available around the clock and quick shipping, so a clinic or shop can standardize on one setup and learn it well. The research is clear that no system reproduces every color perfectly. What gives you confidence is knowing your system, setting it the same way and comparing like with like.
Endoscope
Choosing a system that keeps color consistent
If you are building or replacing a setup, start with the work you do. For small-animal and equine procedures, our veterinary endoscopy equipment range covers portable videoscopes, and the rigid scopes, arthroscopes and otoscopes page covers rigid options. The New Portascope and medical endoscopes page lists portable systems with the light sources and accessories that go with them. For pipes and machinery, see our borescopes, SD-card videoscopes and micro fiber borescopes.
If you already own a scope and its image has changed, we also offer endoscope repairs, listed on our main page.
To see a system in operation before you order, our video library of PVS PortaScopes in use shows operation and cleaning procedures.
FAQ
Why do the colors look different on two endoscopes of the same type?
The sensor, light output, processor settings and display all contribute, so small differences add up. Research on video endoscope systems has long reported marked variation in color reproduction between systems. Setting white balance and the display the same way on each unit brings them closer.
Does white balance fix color rendering completely?
White balance removes the color cast of the illumination, which is the biggest daily variable, so it is the first step every session. It does not change the sensor, lens or processing, so some character of the system remains. Treat it as the foundation of a consistent routine rather than a guarantee of absolute accuracy.
How accurate does endoscope color have to be?
For most practical work, consistency and contrast matter more than absolute accuracy. A 2023 review notes that it is not uncommon for clinical endoscopes to show absolute color errors greater than 20 ΔE00 and still perform their job. What you need is a clear, repeatable difference between normal and abnormal.
Can I measure color performance myself?
The FDA's CPR tool shows how it is done professionally: a standard 24-patch color target is measured through the device and compared with its known values. For daily work, a white reference, fixed display settings and a reference frame at the start of each recording give you a practical check on drift.
Do enhancement modes belong in veterinary or industrial work?
The published evidence comes mostly from human gastroenterology, where color enhancement improved lesion visibility in several studies. The principle carries over: boosting contrast between similar-looking surfaces helps the eye. Choose a system whose image processing suits your cases, and keep the settings the same from case to case.
Sources
- Color Performance Review Tool for Endoscopy Devices, FDA
- DIDSR/cpr, open-source CPR implementation
- Journal of Imaging Science and Technology review on endoscope color, IS&T 2023
- Color rendition in endoscopic video systems, IS&T/SID Color Imaging Conference 1994
- Consistency and Standardization of Color in Medical Imaging, 2014
- Evaluation of the visibility of early gastric cancer using linked color imaging, BMC Gastroenterology 2017
- Image-enhanced endoscopy using laser light sources, Gastroenterological Endoscopy 2019
- TXI: Texture and Color Enhancement Imaging for Endoscopic Image Enhancement, 2021
- Comparison of the detection of colorectal lesions, network meta-analysis 2019
- The appreciation of colour in endoscopy, Vakil 1991