
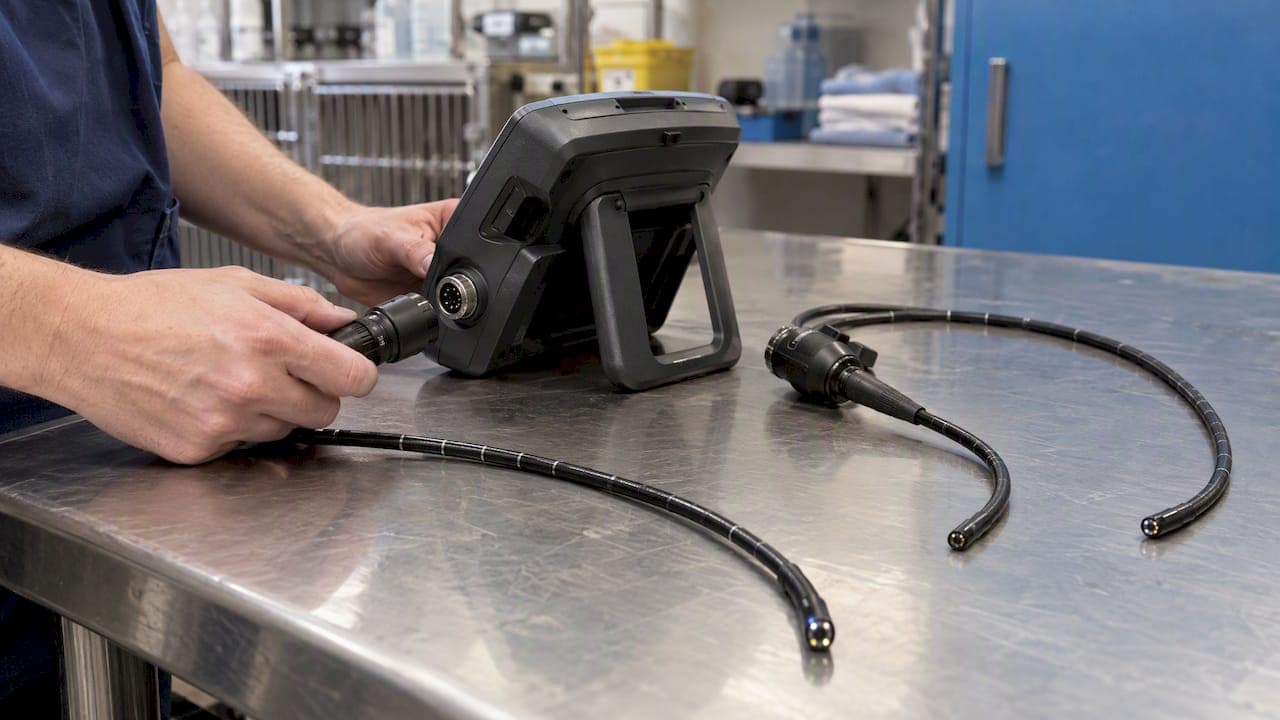
An interchangeable probe videoscope is a handheld or monitor-type inspection system in which the camera probe detaches from the viewing unit. You change the probe to change diameter, length, tip type or articulation, and the monitor, battery, recording and controls stay the same. For a clinic or inspection crew, that means one display and several tools. This guide explains how the connection works, how to confirm a probe fits, what to check for veterinary and industrial work, and how to change, clean and store probes safely.
TL;DR
- An interchangeable probe videoscope separates the probe from the monitor and controller, so one unit can serve different jobs by swapping the probe.
- Compatibility is set by the connector, the electronics inside the probe and the unit's firmware. A probe that physically plugs in is not necessarily one that will work.
- Pick probes by outer diameter, working length, field of view, tip articulation and sealing. Veterinary work adds cleanability and patient size. Industrial work adds temperature, chemical and abrasion exposure.
- Inspect connectors and the probe sheath before every use, clean to the manufacturer's instructions, and store the probe in a loose coil, never kinked.
- Before you buy, send the maker or reseller the exact model and serial number of your unit and ask for written confirmation of probe compatibility.
Table of Contents
- What an interchangeable probe videoscope actually is
- Why users want swappable probes
- How to check that a probe is compatible
- Probe specifications that decide the job
- Advantages and what to verify
- How to change a probe safely
- Cleaning, storage and maintenance
- Perspective
- Our systems for veterinary and industrial work
- Questions to settle before you buy
- FAQ
- Sources
What an interchangeable probe videoscope actually is
A videoscope puts a tiny camera and LED lighting at the tip of a flexible or semi-rigid insertion tube. The image travels electrically to a processor and screen. If you want the basics first, our guide on what a videoscope is, with key features and uses covers the fundamentals.
In a fixed-probe design the insertion tube is permanently attached to the handle or monitor. In an interchangeable design there is a connector between the two. The probe carries the camera chip, the LEDs and, on articulating models, the steering cables. The base unit carries the screen, the battery, the image processing, the SD card or USB recording and the controls.
There are three common layouts:
- Handheld with a plug-in probe. The screen and probe handle are one body, and the probe shaft unplugs at a connector near the handle.
- Monitor plus cable probe. A separate monitor connects to the probe through a cable. You can carry the monitor on a strap and keep the probe in a pouch.
- Tablet or PC-based. The probe connects by USB and the host device does the display and recording.
The connection between probe and base is usually a multi-pin electrical connector. Some also carry a mechanical lock or a steering coupling. That is why "same plug shape" does not guarantee "same system."
Why users want swappable probes
The practical case is straightforward.
- One base, several diameters. A small-diameter probe reaches narrow passages. A larger probe often gives a brighter, sharper image where space allows.
- Different lengths. A short probe is easier to control for airway or nasal work. A longer one reaches deeper into a pipe run or a large animal.
- Different tips. Forward-viewing, side-viewing and articulating tips can share one display.
- Sacrificial wear parts. A probe is the part that bends, scrapes and gets contaminated. If it is damaged, you replace or repair the probe and keep the rest of the system working.
- Cleaning rotation. A clinic with a second probe can keep working while the first is being cleaned and dried, provided the cleaning method allows it.
The trade-off is that you must manage a system of parts. That is manageable with a few habits, covered below.
How to check that a probe is compatible
This is the question that matters most, and it is the one most buyers get wrong by assuming. Work through these checks in order.
1. Identify the exact base unit
Write down the manufacturer, model number, serial number and, if shown in the settings menu, the firmware version. Many product families look identical across several generations while using different probe electronics.
2. Match the connector and pin layout
Compare the connector on your unit with the one on the candidate probe: shape, number of pins, keying and locking method. A photo of both ends, sent to the seller, settles most doubts quickly.
3. Confirm the image sensor and resolution pairing
The probe contains the sensor. The base unit has to accept its signal format. A higher-resolution probe on an older base is typically displayed at whatever the base supports, or not displayed at all. Ask for the pairing in writing.
4. Check the articulation and control interface
On articulating probes, the steering mechanism and the control on the base must correspond. A two-way probe on a base designed for four-way control, or the reverse, may not behave as expected.
5. Check the power and lighting budget
LED output and sensor draw vary by probe. The base must supply what the probe needs without shutting down or overheating.
6. Get compatibility in writing
A model number list from the maker, or an email from the reseller naming your unit and the probe part number, is your protection. If a supplier cannot tell you, treat the combination as unconfirmed.
If you own one of our systems and want to add or replace a probe, send us the model and a photo of the connector and we will tell you what fits. You can reach us through the main 1800endoscope site.
Probe specifications that decide the job
When no code or procedure dictates a probe, the guidance from an NDT instrument maker is that the inspector should rely on knowledge and experience to select one suited to the test, as Evident's probe selection tutorial puts it for ultrasonic probes. The same logic applies to videoscope probes: no single probe is best, so the specification has to follow the task.
| Specification | Why it matters | Veterinary example | Industrial example |
|---|---|---|---|
| Outer diameter | Sets what the probe can enter and how much of the lumen it fills | Narrow for cats, small dogs, exotic species and nasal passages | Narrow for small bores, cooling holes, tight gaps |
| Working length | Sets reach and how much cable you manage | Longer for equine airway and gastric work | Longer for pipe runs, ducts and long cavities |
| Field of view and depth of field | Sets how much you see and what range stays in focus | Wide for survey, closer for lesion detail | Close focus for weld and surface checks |
| Tip articulation | Lets you steer the view without moving the whole shaft | Useful in curved anatomy | Useful around bends and behind obstructions |
| Direction of view | Forward, side or switchable | Side view for walls of a lumen | Side view for pipe walls and bores |
| Sealing | Protects against fluids and washdown | Needed for cleaning between patients | Needed for oil, coolant and water |
| Sheath material | Resists abrasion and chemicals | Compatible with the cleaning agents you use | Resistant to oils and rough surfaces |
For veterinary examination
Start with the patient. A probe that is too thick for the animal is of no use however sharp the picture. For small animals, diameters in the 5.8 to 7.0 mm range are a common starting point, and our buying guide for small animal clinic endoscopes walks through that choice. For horses, airway and gastric work call for longer insertion tubes, which is why we offer equine systems such as the PVS3M 3 meter semi-portable system and the 12.9 mm by 3.5 meter gastroscope system.
Also confirm that the probe sheath tolerates your disinfectant and that the connector end is protected during cleaning. If you are deciding which scope to start with, see which endoscope a veterinary clinic should buy first.
For industrial inspection
The environment is the main variable. Check temperature limits, resistance to oil and solvents, and whether the tip can survive contact with sharp edges. Match the diameter to the smallest opening you will pass through, then the length to the farthest point you must reach. For pipe work, a longer probe on a monitor-type base is easier to handle. Our borescope and pipe inspection range includes monitor-type SD-card videoscopes, portable pipe inspection systems and micro fiber borescopes.

Advantages and what to verify
Interchangeable probes give you flexibility, lower cost of ownership over time and easier repair. To get those benefits, verify a few things up front.
- Connector durability. The connector is used every time you swap. Ask about its rated cycles and whether it is sealed.
- Seal integrity at the connection. Fluid must not reach the connector. Keep the sealing cap or cover in place during cleaning.
- Image consistency. Different probes can show different color balance or brightness. Check the image with each probe you plan to use.
- Parts availability. Confirm that replacement probes for your base will be available over its working life.
- Calibration and measurement. If you use on-screen measurement, a probe change may require a calibration step. Follow the maker's instructions.
- Recording. Confirm that every probe records to the same card or USB path. Our guide to optimizing endoscope video recording for vets covers settings that carry across probes.
How to change a probe safely
Follow the manual for your unit first. The general sequence is consistent across designs.
- Power down the base. Hot-swapping is only acceptable if the manual says so.
- Inspect both connectors. Look for moisture, debris, bent pins or cracks. Do not connect a wet or dirty connector.
- Align the keying. Push straight in without twisting. If it does not seat, stop and check alignment rather than forcing it.
- Engage the lock. Click, screw or latch as designed, and give the probe a gentle tug to confirm it is secure.
- Power up and test. Check the image, lighting, articulation range and recording before you use it on a patient or on a customer's equipment.
- Protect the removed probe. Cap the connector and put the probe in its case.
If the image flickers, drops out or the unit does not recognize the probe, reseat the connector once. If the problem persists, our videoscope troubleshooting guide for vet professionals lists the common causes.
Cleaning, storage and maintenance
Cleaning
Use only the cleaning and disinfecting method the manufacturer specifies for that probe. Not every probe is fully immersible, and the connector end is usually not. Clean soon after use so that debris does not dry on the sheath and tip. Rinse, dry, and inspect before putting it away. Our site has operation and cleaning procedure videos for the PVS PortaScope line, and the FAQ and inspection procedures page answers common handling questions.

For veterinary use, reprocessing between patients is part of your clinic's infection control protocol. Ask your supervising veterinarian or your infection control lead to confirm the method that fits your protocol and your probe's rating.
Storage
- Coil the probe loosely in its case, following the minimum bend radius in the manual.
- Never hang it by the tip or let the sheath bear weight.
- Store dry, away from heat sources and direct sunlight.
- Keep connector caps on, and keep spare probes labeled by length and diameter so you pick the right one quickly.
Routine checks
Before each use, run your fingers along the sheath for kinks, flat spots or swelling. Look at the tip window for scratches or fogging. Check articulation by moving through its full range. If anything feels stiff or looks damaged, take the probe out of service. Sheath damage can let fluid reach the electronics, and it is far cheaper to fix early. We also handle endoscope repairs if a probe needs attention.
Perspective
We build our catalog around the idea that a clinic or inspection crew should not need a hospital budget to get a clear image. In our experience, the buyers who are happiest with a videoscope are the ones who matched the probe to the job, not the ones who bought the most features.
When customers ask us about interchangeable probes, we start with three questions: what is the smallest opening you need to enter, how far do you need to reach, and how will you clean it? Those answers narrow the choice faster than any spec sheet. Our portable monitor-type systems are designed to put a usable image, SD-card recording and a manageable cleaning routine in one case, at a price that suits small clinics and field technicians.
We also tell customers to confirm compatibility before ordering anything, and we are glad to do that check with you. A thirty-second email with your model and a connector photo saves a return and a day of downtime.
Endoscope
Our systems for veterinary and industrial work
If you are ready to compare systems, start with the category that matches your work. Veterinary teams can browse our veterinary endoscopy equipment and endoscopes, including the 6 mm by 150 airway inspection system with direct monitor and SD card video and the equine 8 mm USB field scope. Industrial inspectors can go straight to our borescopes. If you need accessories such as biopsy forceps, see our flexible biopsy forceps.
Tell us the application and the diameter and length you need, and we will point you to the right system or confirm whether a probe will fit the unit you already own.
Questions to settle before you buy
Use this list when you talk to any supplier, including us.
- What is the exact model of the base unit, and which probe part numbers are confirmed for it?
- What are the probe's outer diameter, working length, field of view and focus range?
- Is the probe sealed, and to what level? Is the connector sealed?
- Which cleaning agents and methods are approved for the sheath and tip?
- Does the probe record at the same resolution as the base unit supports?
- Is the probe repairable, and what is the turnaround?
- What accessories, such as biopsy forceps, valves and light sources, work with this probe? See our medical and accessories page.
- Does the system suit the species or the inspection type you handle? Our guide to videoscope applications for veterinary and industrial use can help you decide.
For features that affect daily use, such as image processing and recording options, see our overview of advanced videoscope features.
FAQ
Can I use any probe with my videoscope if the connector looks the same?
No. A matching plug shape does not mean matching electronics, firmware or control signals. Confirm the base model and the probe part number with the maker or reseller, and get the confirmation in writing before you order.
Can one base unit serve both veterinary and industrial work?
Often the base can, but you should use separate probes and keep them separate. Probes that have been used in industrial settings should not be used on patients, and each environment needs its own cleaning approach. Ask your supplier which probes your base accepts for each use.
How do I know when a probe needs repair or replacement?
Look for image dropouts, fogging, dark or flickering LEDs, stiff or uneven articulation, and visible sheath damage. Take it out of service when you see any of these. A repair check is usually worth more than continuing to use a compromised probe.
Should I clean the connector the same way as the probe shaft?
Not unless the manual says so. The connector is typically not designed for immersion. Keep it capped and dry, and follow the maker's instructions for wiping and drying it.