
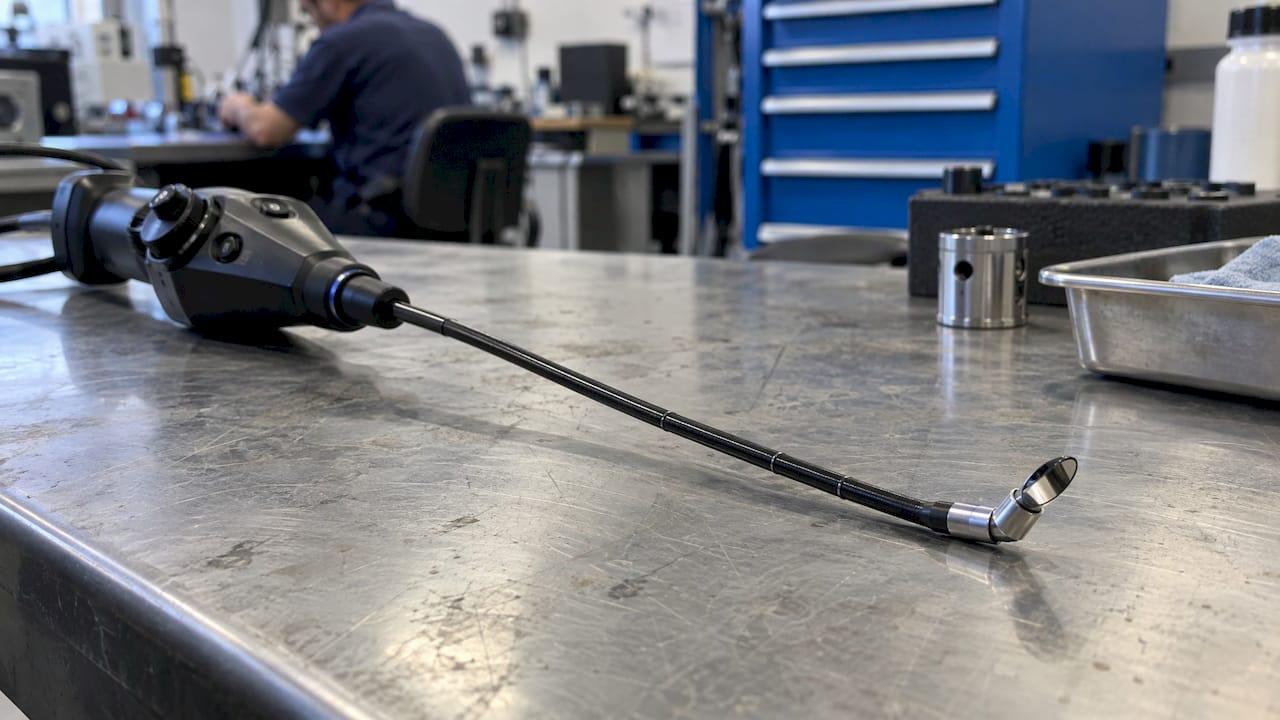
A mirror tip turns a forward-looking borescope into a side-viewing one. Choose a mirror that nearly fills the bore without touching the wall, thread it on firmly, keep it centered and clean, and read the image knowing it is reversed. Those four habits decide whether a mirror gives you a sharp look at the wall of a bore or a blurry, off-center guess.
This guide is for veterinary and industrial professionals who already own or specify a borescope and want to use side-view attachments with confidence: technicians checking bores, tubes and cylinders, and buyers deciding which accessories a scope needs.
TL;DR
- A mirror tip reflects the view 45 or 90 degrees off the probe axis, so a straight camera can see the wall of a tube instead of only what is ahead.
- Match mirror diameter to the bore. Too small and the image drifts off-center and loses focus. Too large and it will not pass through.
- Thread the mirror on firmly, adjust focus until the wall is crisp, and use a notch or marker to know which way the mirror is actually looking.
- Keep the mirror out of oil and debris, clean it after every job, and record footage so findings can be shared.
- Confirm that a mirror fits your scope model before you order. Mirrors made for one scope generation do not always fit another.
Table of Contents
- What a mirror tip actually does
- Where a side-view mirror earns its place
- Choosing the right mirror size
- Fitting a mirror step by step
- Moving and orienting the mirror inside the bore
- Reading a mirrored image
- Keeping the mirror clean and in place
- What a mirror view cannot tell you
- Record what you see
- Troubleshooting common mirror problems
- Our point of view
- Equipping for side-view inspection
- FAQ
- Sources
What a mirror tip actually does
A standard borescope camera looks straight ahead. That is fine for finding an obstruction at the end of a pipe, but it tells you little about the wall you are passing. A mirror tip is a small angled mirror mounted at the end of the probe. The light travels down the probe, strikes the mirror and lights the wall beside it. The reflection returns to the mirror and then to the camera.
That is the mechanism one well-known reloading site describes: an LED light is projected down the tube, hits the mirror, reflects off the viewing surface and returns to the mirror to be captured by the camera. The same source notes that a 90-degree mirror gives a different view of features such as the crown of a barrel and gas ports. Firearms are only one use of the technique, but they are where the mirror hardware has been described in the most detail, and the principles carry straight over to any small bore.
Two angles are common:
- 90 degrees: looks straight at the wall. Best for surface condition: scoring, pitting, corrosion, deposits, machining marks.
- 45 degrees: looks forward and sideways at once. RifleMagazine describes a 45-degree mirror that slid over a slim tube and gave a direct view of the bore sides. It helps when you want to see the wall and still keep track of where you are heading.
Where a side-view mirror earns its place
A mirror is worth fitting whenever the defect lives on the wall rather than at the end of the tube. Typical cases for the readers of this page:
- Industrial bores and tubes: hydraulic cylinders, valve bodies, heat-exchanger tubes, machined passages and cross-drilled holes, where tool marks, scoring and corrosion sit on the wall.
- Weld and seam checks inside small pipes, where a forward view shows the weld only as a ring in the distance.
- Machining audits: a mirrored view of a freshly bored or reamed hole shows chatter, ragged transitions and leftover burrs. Gunsmith Journal describes how a borescope can instantly diagnose problems such as a chattering reamer or a ragged leade that trial and error would take weeks to uncover, and the same logic applies to any precision-drilled part.
- Narrow clinical or field access points where a clinician or technician needs to see the wall of a channel that a forward-facing probe only passes through. For the clinical side of scope selection and handling, see our guides on how to use flexible borescopes for accurate diagnostics and best borescopes for vets.
If the question is only whether a passage is clear, a mirror adds nothing. If the question is the condition of the surface, the mirror is the accessory that answers it.
Choosing the right mirror size
Size is the single most important choice, because the mirror must sit close enough to the wall to light it and focus on it, while still passing through the narrowest point of the bore.

A useful reference is how sets are built. One Guns and Ammo review of a rifle borescope lists a 26-inch rod with five interchangeable angled mirrors of .2, .24, .28, .34 and .4 inch, each chosen to suit a range of bore sizes, with 1920x1080 HD capture. The pattern is worth copying even outside firearms: a graduated set of mirrors in small steps, so there is always one that nearly fills the bore.
Use this logic when selecting:
- Measure the smallest point the mirror must pass, not the nominal bore. Burrs, shoulders, threads and steps narrow the path.
- Pick the largest mirror that passes freely. A close fit keeps the mirror centered and the wall within focus range.
- Step down, not up, if in doubt. A mirror that jams in a bore can scratch the wall or the mirror, and recovering it costs more time than swapping to a smaller size.
- Allow for the probe behind it. The probe and cable must also move freely, so check them against the narrowest point too.
The tube behind the mirror matters as well. Gunsmith Journal describes a system in which the rigid tube comes in two diameters, 0.250 inch and 0.165 inch, with the slimmer one suiting .22 bores and larger. The lesson for any buyer: the smallest bore you need to inspect sets the probe diameter first, and the mirror options follow from it.
A quick sizing example
Suppose you inspect a machined passage that measures 0.30 inch at its tightest point. A mirror of about 0.28 inch leaves a small clearance on each side, so it travels without dragging and stays near the center line. A 0.20-inch mirror in the same passage will pass, but it floats off-axis and sits much farther from one wall than the other, which makes brightness and focus uneven. A 0.34-inch mirror will not enter at all. The middle size is the right answer.

Fitting a mirror step by step
Fitting is simple, but small mistakes here cause most of the problems people later blame on the mirror.
- Power down and inspect the probe tip. Remove any protective cap. In the review above, the rubber cap comes off the end of the rod and the mirror threads on in its place.
- Thread the mirror on by hand and snug it. Do not use pliers on the mirror housing. Over-tightening can distort it, while under-tightening lets it rotate during insertion.
- Set focus. On designs with a threaded mirror, the same review notes that focal distance is adjusted by screwing the mirror in or out from the camera head. Other designs use a focusing ring on the handle. Either way, adjust against a real target of the same bore size, not a bench-top object at a different distance.
- Mark the direction of view. Make sure you know which side the mirror faces relative to the handle. Some designs build this in: Gunsmith Journal notes that the mirror tube has a small notch at the rear to show which direction you are actually looking. If yours does not, add a tape mark or paint dot on the handle.
- Set insertion depth markers. A rubber stop or tape flag on the probe lets you return to the same position for repeat measurements.
Check compatibility before you buy
Mirrors are not universally interchangeable. Thread pitch, diameter, and focus mechanism differ between scope families, and even generations of the same family can differ. Before ordering a mirror set, confirm the exact scope model and the mirror's stated compatibility with the maker or seller. Buying the mirror together with the scope that it was designed for removes the guesswork entirely.
Moving and orienting the mirror inside the bore
Insertion technique matters as much as hardware.
- Go slowly and let the probe follow the bore. Pushing quickly makes the mirror skate across the wall and blur the image.
- Rotate to sweep the wall. A rubberized grip that allows the camera to turn through a full 360 degrees lets you sweep the entire circumference at each depth, as the Guns and Ammo review describes. Work in fixed steps: rotate a full circle, advance a set distance, repeat.
- Use a guide when the bore is larger than the mirror. Technicians who use a smaller mirror than the bore often add a centering sleeve or guide so the tip does not wander. Any thin, smooth sleeve that matches the bore and does not scratch it will do the job.
- Pull back, do not push through. Inspect on the way out where possible, so the cable trails behind you and does not catch on what you have already seen.
Reading a mirrored image
A mirror flips the picture, and that confuses new users.
- The image may be reversed. Gunsmith Journal explains that the image through a straight eyepiece is reversed out of optical necessity. On a digital monitor the effect depends on the scope and its settings, so test it once on a known mark: put a piece of tape on one side of a test tube, insert the probe and see which way it appears.
- Rotation and direction can be misleading. If you turn the probe clockwise and the image appears to sweep the other way, that is normal with a mirror. Learn it on a test piece before you rely on it in a job.
- Scale changes. A wall seen close up through a mirror looks larger than the same feature at a distance. For defects that must be measured, record the depth marker and compare against a reference of known size.
- Brightness varies with distance. Light falls off quickly. If one side of the frame is dark, the mirror is probably off-center, which points back to sizing or to a missing guide.
Keeping the mirror clean and in place
An unsecured or dirty mirror gives false findings, because smears and droplets look like defects.
Keep it out of contamination. Gunsmith Journal cautions that the lens and mirror are of high optical quality and must not be pushed into oil or debris in the barrel, and its kit includes a lens cleaner and swabs. Clean and dry the passage first whenever you can. A quick pass with a patch or swab before the camera goes in is cheap compared with replacing a coated mirror.
Stop it from loosening. If a threaded mirror creeps while you move through a bore, check these in order:
- Threads clean and free of grit.
- Locking ring, if your design has one, seated against the mounting face.
- Mirror size too small for the bore, so the tip is bouncing off the wall as it travels. A closer-fitting mirror or a centering guide usually fixes this.
- Cable drag. A long unsupported cable pulls on the tip, so support it with your free hand.
Protect it between jobs. Store mirrors in their own compartments, never loose in a case with metal tools. Scratches on the mirror surface scatter light and look like pits. Our lens scratch prevention guide covers handling habits that apply equally to mirrors and lenses.
Clean after every use. Use a lint-free swab and an optical-grade cleaner, wipe once in one direction and let it dry. Repeated dry rubbing grinds dust into the coating.
What a mirror view cannot tell you
A mirror gives you a clear look at the surface. It does not give you a verdict on performance. RifleMagazine makes the point with barrels: a borescope does not tell how well a barrel will shoot, and a bore that looked nearly perfect after reworking had been enlarged in the process. The same is true in industrial work. A clean-looking wall does not prove tolerance, so pair visual inspection with the measurement your job requires, and record what you saw next to the measurement.
The same article also notes that flexible borescopes, while not as sharp or bright as rigid scopes, reveal enough for most purposes, such as machining flaws, fouling build-up, cleaning results or corrosion and erosion. Rigid tubes can be limited when they cannot be inserted from a given end. Pick the scope type that reaches the access point first, then fit the mirror that suits it.
Record what you see
A mirrored image is hard to describe in words, and a short video is better than notes. The Ultimate Reloader author calls recording footage to share with customers or other gunsmiths extremely important and prefers wireless units because there is no cord to tangle. Both points matter for clinics and inspection teams: a recorded sweep lets a second person review the wall without repeating the entry, and it gives you a before-and-after record. Our guide to optimizing endoscope video recording covers settings and file habits that make footage easier to review.
A practical routine for each job:
- Say the part number, bore size and mirror size at the start of the clip.
- Show the depth marker at each step.
- Record one complete rotation per step.
- Save the file under the part or case ID the same day.
Troubleshooting common mirror problems
| Symptom | Likely cause | Fix |
|---|---|---|
| Image soft on one side | Mirror off-center in the bore | Use a larger mirror or add a centering guide |
| Whole image out of focus | Focus set at the wrong distance | Re-adjust the focus on a test piece of the same bore |
| Dark crescent in the frame | Mirror too small, light falls on one side only | Step up one mirror size |
| Smears or spots that move with the probe | Dirt on the mirror | Clean with a lint-free swab and optical cleaner |
| Mirror turns while inserting | Loose thread or drag on the cable | Re-seat the mirror, support the cable |
| Mirror will not thread on | Wrong thread or scope generation | Confirm compatibility with the scope model |
For wider scope faults such as dim light, flicker or lost signal, see our endoscopy troubleshooting guide.
Our point of view
Most mirror problems we hear about are really system problems. The mirror was fine, but it did not match the probe, the bore was measured at the wrong spot, or the footage was not saved. A mirror tip works best as part of a complete setup: a probe sized for the narrowest bore, a light source that fills the wall, a monitor or recorder that captures what you see, and accessories that suit the scope.
That is why we focus on portable, affordable videoscopes with monitors and SD-card recording for veterinary and industrial professionals. Portability and recording are the features that make a side-view inspection repeatable, and affordability means a clinic or inspection team can equip more than one station instead of sharing a single scope.
When you plan an inspection, start from the narrowest point, choose the scope that reaches it, and then choose the angle of view you need. Our team is available around the clock to help match a scope to a job.
Endoscope
Equipping for side-view inspection
If you are building or updating an inspection kit, begin with the scope and then add the angle of view. Our borescopes range includes monitor-type SD-card videoscopes, portable pipe inspection videoscopes and micro fiber borescopes, so you can pick the probe size and format that suits your narrowest access point. For veterinary work, our rigid scopes, arthroscopes and otoscopes cover the rigid end of the range, and our endoscopic accessories round out the set. Scopes that need servicing can go through our endoscope repairs service on the main site.
For orders and questions about which scope suits your bore, start at the 1800endoscope home page.
FAQ
What is a borescope mirror tip used for?
It redirects the camera's view sideways, usually at 45 or 90 degrees, so you can inspect the wall of a bore, tube or cylinder instead of only the area ahead. It is the right accessory when the defect you need to see is on the surface, such as scoring, corrosion or machining marks.
How do I choose the right mirror size?
Measure the narrowest point the mirror must pass and choose the largest mirror that moves through it freely. A close fit keeps the mirror centered and the wall in focus. Sets are usually made in small steps, for example from .2 to .4 inch in one review of a five-mirror kit, so one size will normally match your bore.
Why is my mirrored image reversed or confusing?
Mirrors flip the view, and the effect can differ between eyepiece and monitor designs. Gunsmith Journal explains that reversal is a result of optical necessity, and some mirror tubes carry a notch to show the true direction of view. Practice on a test piece with a tape mark so you know which way the image moves.
Will any mirror fit my borescope?
No. Thread, diameter and focus method vary between scopes, and mirrors made for one model or generation may not fit another. Confirm the exact scope model against the mirror's stated compatibility before you order, or buy the mirror with the scope it was designed for.
How do I stop the mirror from moving while I inspect?
Seat the thread firmly, use a mirror close to the bore size, support the cable so it does not pull on the tip, and add a thin centering guide if the bore is larger than the mirror. Insert slowly and sweep in fixed steps rather than pushing the probe through in one pass.
Sources
- How Do You Properly Use a Borescope? Ultimate Reloader
- The Inner Lives of Rifle Barrels, RifleMagazine
- Borescope review, Guns and Ammo
- Borescope article, Gunsmith Journal, June 2012