
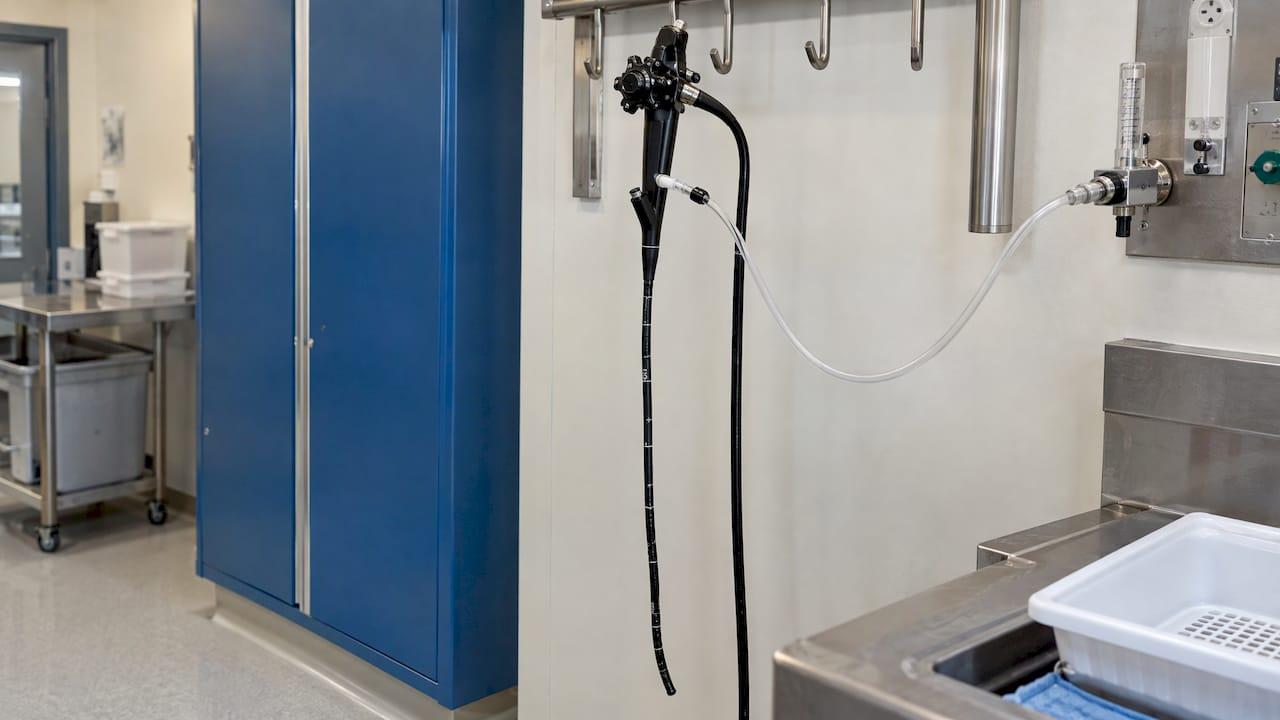
There is no single drying time for a veterinary endoscope, because the time depends on the method. Forced air through the channels is measured in minutes: the AAMI ST91 standard sets a minimum of 10 minutes of pressure-regulated instrument air or HEPA-filtered air. Hanging a scope and waiting is measured in hours. Whatever you choose, the scope should be dry before it goes into storage, and the way to be sure is a routine you can repeat and check, not a timer alone.
This guide is for clinic teams, technicians and procurement managers who reprocess flexible and rigid scopes. It covers drying times by method, the correct order of steps, how to confirm a scope is dry, what to do when a channel stays wet, and how to set up the routine so it survives a busy day.
TL;DR
- Active drying with forced air takes minutes: AAMI ST91 sets a minimum of 10 minutes of regulated instrument air or HEPA-filtered air, and it applies even after automated reprocessing.
- Passive drying takes far longer. Cabinet airflow can need 90 minutes to several hours, depending on the scope's design and channel layout.
- The sequence is rinse, alcohol flush, forced air through every channel, exterior wipe, then hang vertically. Never case a damp scope.
- Drying is verified, not assumed: inspect channels, check for droplets, and record the result for each scope.
- A scope that is still wet at the end of the routine goes back through the drying step before it is stored or used.
Table of Contents
- Why drying matters more than the timer
- Drying time by method
- The drying routine, step by step
- How to verify a scope is dry
- If a channel is still wet
- Setting drying time for your clinic
- Our perspective
- Equipment that fits the routine
- FAQ
- Sources
Why drying matters more than the timer
Water left in a channel is where bacteria multiply. Reprocessing can leave a scope clean and disinfected, and moisture left behind can still undo that work during storage. The AAMI ST91 update, a 2021 standard published in March 2022, states that endoscopes should be dried before storage or reuse, never stored wet, and that drying should be monitored with drying verification tests.
The CDC disinfection and sterilization guideline (2008, updated June 2024) describes the standard sequence: a tap-water or filtered-water rinse, then an alcohol rinse, then forced-air drying. It notes that this markedly reduces bacterial contamination of stored endoscopes.
For a clinic, that has a practical meaning. A veterinary scope is often used on several patients a day, then stored in a cabinet or a case until the next procedure. The drying step is the one that most often gets shortened when the schedule is tight, so it needs a defined time and a defined check.
Drying time by method
The figures below come from standards, guidelines and published studies. They are not interchangeable, because each describes a different method.
| Method | Typical time | What it tells you |
|---|---|---|
| Forced instrument air or HEPA-filtered air through channels | Minimum 10 minutes (AAMI ST91) | The floor for active drying, needed even after automated reprocessing |
| Alcohol flush, then forced air through irrigation adapters | 20 to 30 minutes of forced air (dvm360 proceedings) | A common veterinary routine when air supply is available |
| Workstation air application on the biopsy channel | Studied at 0.25 MPa, with a minimum of 45 seconds for satisfactory channel drying (2026 study) | Short bursts can work, but only with controlled pressure |
| Cabinet airflow | 90 minutes to several hours, depending on device and channel configuration (PMC review, 2023) | Passive drying is slow and varies with the scope |
| Combined laminar and turbulent airflow | About 6 minutes per cycle in a 2024 prospective study (PMC, 2024) | Reduced residual water and bacterial contamination compared with standard automated drying |
Two things stand out. First, active drying is much faster than waiting. Second, the same review that gives the cabinet range says that the actual time varies with the complexity of the scope and its channel configuration. A long gastroscope with several channels does not dry like a short rigid otoscope.
Channels versus exterior
The channels are the slow, risky part. Air has to push water out of a long, narrow lumen, and any pooled water stays there. The exterior is simple by comparison: wipe it with a clean, dry cloth and let the remaining moisture evaporate in a ventilated space.
A guideline allowance is worth knowing. According to the 2023 review, a scope can be used wet for the next patient if it goes straight into use. In that case the limited drying is meant to dry the electrical contacts and prevent dripping or accidents. That allowance covers immediate reuse only. Storage is a different situation and needs full drying.
The drying routine, step by step
This is the routine we would hand a new technician. It assumes cleaning and disinfection are already done. For those earlier steps, see our guides on step by step endoscope sterilization and high-level disinfection versus sterilization.
1. Rinse after disinfection
Rinse every channel and the exterior with filtered or tap water, as the CDC sequence describes, to remove disinfectant residue. Use the adapters that fit your scope so the water goes through the channels and not around them. Where it goes wrong: a rinse through an unseated adapter leaves the channel with only partial flushing, and the water you did not remove is what you must dry later.
2. Flush with alcohol
Flush the channels with 70% isopropyl alcohol. The dvm360 veterinary proceedings give this as the step before forced air, and the CDC guideline lists an alcohol rinse in the same position. Alcohol displaces water and helps the channel dry faster. Where it goes wrong: a flush that is too short or only partly filled leaves water droplets behind. Run enough alcohol to fill the channel from end to end.
3. Force air through every channel
Connect the air source and push air through the suction, biopsy and air or water channels. Use pressure-regulated instrument air or HEPA-filtered air, because room air from an uncontrolled compressor can carry oil and particles into a clean channel. The standard sets a floor of 10 minutes. The veterinary routine in the proceedings uses 20 to 30 minutes through the irrigation adapters when equipment is available.
Where it goes wrong: pressure that is too high can damage the scope, and a pressure that is too low leaves water pooled in the bends. Follow the maximum pressure in your scope's reprocessing instructions, and time the step with a visible timer rather than a guess.

4. Dry the exterior and the connectors
Wipe the insertion tube, control body and eyepiece or video connector with a clean, dry, lint-free cloth. Pay attention to the electrical contacts and the connector, because water there causes the faults that end up as repairs. Our preventive maintenance schedule shows where moisture-related problems usually start.
5. Hang the scope vertically
Hang the scope in a well-ventilated area away from high traffic, and do not coil it. The dvm360 guidance notes that coiling lets water pool in the channels and encourages bacterial growth. The HICPAC essential elements (2016) say storage should prevent recontamination, protect the equipment and promote drying, and that cabinets may allow vertical or purpose-designed horizontal storage.
6. Keep damp scopes out of their cases
A carrying case traps moisture, and the dvm360 guidance is explicit: do not store a scope in its case while it is damp. Field scopes, such as the ones used for equine airway work, are the ones most often cased in a hurry at the end of a farm call, so give them the same drying time at the clinic before they go back into the case. For storage layout, see how to store endoscopic equipment.
How to verify a scope is dry
A timer tells you how long air ran. It does not tell you that water is gone. The ST91 update calls for drying verification tests for this reason, and the research gives clinics several practical checks.
- Look into the channel. The AORN guidance says staff should use a clean borescope to visually inspect accessible channels before sterilization or high-level disinfection, which can reveal damage or debris. The same inspection helps you see moisture and residue in channels after drying.
- Check the channel exit for droplets. Hold a clean, dry surface or a lint-free cloth at the distal end while air runs. Visible droplets or damp spots mean the channel is not done.
- Use a drying verification product or test where you have one. Follow the manufacturer's instructions and record the result.
- Log each scope. Write the scope, the date, the drying method, the minutes of forced air and the person who checked it. A log makes the drying step visible, and gaps show up quickly.
Why insist on a routine and not on the operator's judgment? The 2023 review by Ulrike Beilenhoff notes that manual drying is very susceptible to human error and is often neglected in busy clinical settings. A fixed time, a fixed check and a written log take the guesswork out of a step that people tend to rush.
A second caution comes from the literature. Tian et al. suggest considering multiple or combined drying methods case by case, because no single method has been shown to eliminate every droplet and all microbial growth. In practice, that means combining the alcohol flush, forced air and vertical hanging, rather than depending on one of them.
If a channel is still wet
Treat a wet channel as a failed step, not a small delay. Put the scope back on forced air, repeat the alcohol flush if the channel looks contaminated or damp, and re-check before storage. Do not close it in a case to finish drying.
Water that keeps returning points to something mechanical. A kinked or partly blocked channel, a leaking valve or a damaged adapter can all hold water. Inspect the channel with a borescope, and check the valves and seals. If you find damage, the scope needs service rather than more drying cycles.

The problem is not limited to clinics. An FDA recall notice from 2023 said a manufacturer's channel air-drying process after repair was not validated, and that some scopes returned from repair had a wet channel. The manufacturer was implementing a validated process and interim water inspections. The lesson for a clinic is simple: when a scope comes back from any repair, inspect the channels for water before it goes into service, and run it through your own drying routine.
Setting drying time for your clinic
Pick a method, set a time that meets the standard, and write it down.
- Start from the instructions for use. Each scope has reprocessing instructions with the compatible adapters and pressure limits. Your time and pressure come from there.
- Set a floor of the standard's 10 minutes of regulated forced air, and extend it where your scope's channels are long or complex. The veterinary proceedings use 20 to 30 minutes.
- Add passive hanging time when scopes will be stored overnight. Hang them vertically in a ventilated, low-traffic space.
- Decide who verifies. One named person per shift signs the drying log.
- Review after repairs. Any scope back from service gets a channel inspection and a full drying cycle before use.
Procurement managers should think of drying as part of the equipment setup. A clean air source with a pressure regulator, the right adapters and a ventilated hanging space cost little next to the cost of a damaged scope. Match the adapters to each scope when you buy, so the routine works from the first day. Our guide to which endoscope a clinic should buy first and the equipment basics page help you plan this alongside the scope itself.
Industrial inspection teams that use borescopes in wet or dirty environments face a similar question for a different reason: moisture in the connector or the optics shows up as fogging and faults, not as infection risk. The routine is shorter, wipe, dry, inspect, then store in a dry place, and our inspection prep guide covers it.
Our perspective
Drying is the step clinics most often cut short, and it is the step that decides whether a clean scope stays clean in the cabinet. We build our guidance around a fixed routine: alcohol flush, forced air through every channel, a dry exterior, vertical hanging, and a log entry.
Our focus is veterinary and industrial endoscopes, so we think about drying in terms of the scopes our customers actually run: small-diameter videoscopes, equine airway and gastroscopes, rigid scopes and borescopes. These are portable tools, used in barns, mobile practices and plants, and they go back into cases quickly. A clear drying routine matters most there.
We also supply the accessories that make the routine easier to follow, including valves and cleaning tools, and we repair endoscopes. If a scope keeps coming back wet, or a valve or channel looks damaged, repair is the right next step, and it is a service we offer.
We publish videos of our PVS PortaScopes in use, with operation and cleaning procedures, so your staff can see the handling before they do it themselves.
Endoscope
Equipment that fits the routine
A drying routine works when the equipment suits it. We sell veterinary and industrial endoscopes, rigid scopes, borescopes, biopsy forceps and endoscopic accessories such as pumps, valves and cleaning tools, and we offer endoscope repairs. Browse the endoscopic accessories for the parts your routine uses, or see our PortaScope operation and cleaning videos before you set your procedure.
For equine work, our portable 8 mm airway field scope and our 3 meter gastroscope are built for field use, where fast, reliable cleaning and drying between patients matter.
FAQ
How long should a veterinary endoscope dry after reprocessing?
For active drying, AAMI ST91 sets a minimum of 10 minutes with regulated instrument air or HEPA-filtered air. Veterinary proceedings describe 20 to 30 minutes of forced air after an alcohol flush. Passive cabinet drying can take 90 minutes to several hours, depending on the scope.
Can I store an endoscope that is still slightly damp?
No. Scopes should be dried before storage and never kept in a case while damp, because moisture pools in coiled channels and encourages bacterial growth. A scope may go straight into use on the next patient while wet, but drying is needed before storage.
Do I need to dry a scope that went through an automated reprocessor?
Yes. The AAMI ST91 update states that active drying is needed even after automated endoscope reprocessing. Use forced regulated or HEPA-filtered air, then verify that the channels are dry.
How do I know the channel is dry?
Inspect accessible channels with a clean borescope, check the channel exit for droplets while air runs, use a drying verification test where you have one, and log the result for each scope. A timer alone does not confirm dryness.
Sources
- The New AAMI ST91: An Updated Standard for Flexible Endoscope Processing
- CDC Guideline for Disinfection and Sterilization in Healthcare Facilities
- Care and maintenance of endoscopy equipment (Proceedings), dvm360
- Endoscope reprocessing: How to perform an adequate air drying (PMC, 2023)
- A New Drying Method of Thermolabile Flexible Endoscopes (PMC, 2024)
- Optimization of Air Application Duration for Biopsy Channel Drying
- The Effectiveness of Drying on Residual Droplets (PMC, 2021)
- HICPAC: Essential Elements of a Reprocessing Program for Flexible Endoscopes
- AORN Periop Today: Improve Flexible Endoscope Safety
- FDA Class 2 Device Recall notice