
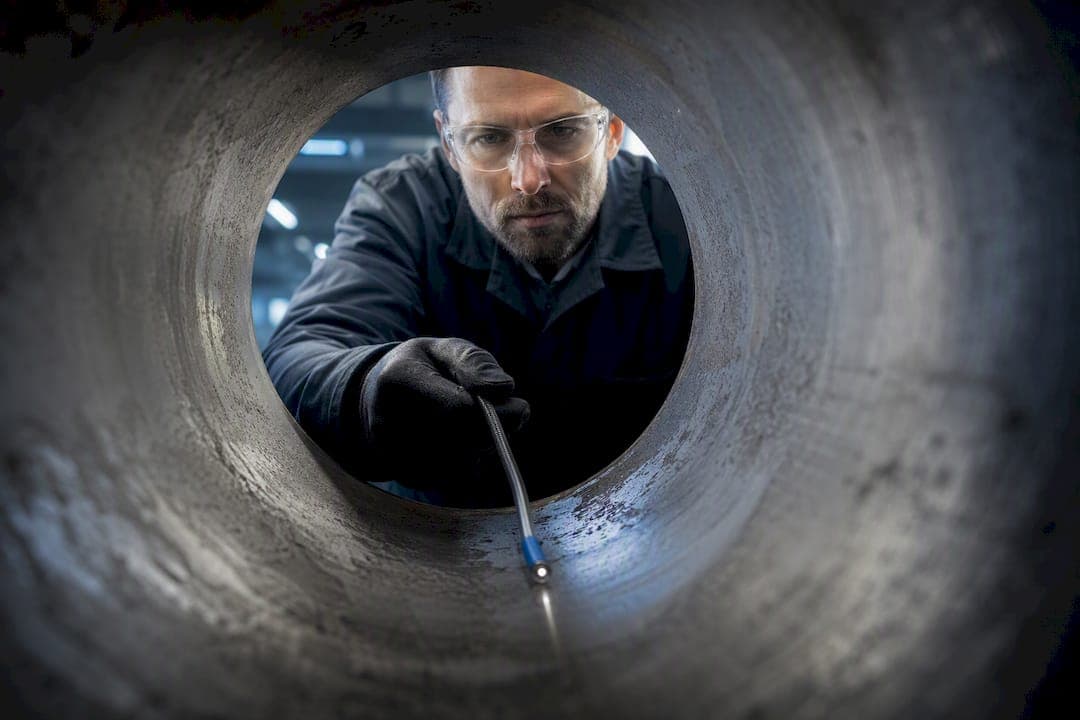
If your primary work is veterinary diagnostics or surgery, start with a versatile videoendoscope in the flexible gastroscope size range, ideally with a working channel for instruments. If you're buying for industrial inspection or NDT, prioritize an articulated videoscope with high-resolution recording and onboard measurement tools. Either way, the first real filter is physical: match insertion diameter and working length to the access geometry, because a scope that can't reach the target is useless no matter how good its optics are.
TL;DR:
- Measure access diameter and depth accurately to select a scope with appropriate insertion size and working length for your specific procedures.
- Prioritize scopes with articulation and deflection range that match the complexity of the paths needing navigation, especially in tight or curved passages.
- Confirm that the scope's recording, imaging resolution, and accessory compatibility meet your documentation and procedural needs before purchasing.
- Proper cleaning, leak testing, and regular maintenance are essential to extend scope lifespan and reduce infection risk, with detailed protocols on materials compatibility.
- Ensure vendor support includes prompt repair, comprehensive training, and spare parts availability, as these factors greatly influence long-term operational costs.
Table of Contents
- What Type of Scope Fits Your Plumbing Borescope Guide Job?
- Which Specs Actually Determine Performance?
- How Much Training Does the Team Actually Need?
- What Cleaning and Maintenance Protocol Keeps a Scope in Service?
- What Should You Ask a Vendor Before You Buy?
- Where Do Borescopes Get Used in Pipe and Access Inspections?
- How Do Plumbing-Style Borescopes Compare to Veterinary and Industrial Scopes?
- What Goes Wrong Most Often During Inspections?
- How Do You Read What the Scope Actually Shows You?
- Vendor Perspective: Common Client Mistakes and Practical Shortcuts
- How Can 1800endoscope Help You Choose the Right System?
- Sources
What Type of Scope Fits Your Plumbing Borescope Guide Job?
Rigid endoscopes still win for body-cavity work and minimally invasive surgery. Arthroscopy and laparoscopy tasks benefit from the sharper optics and steadier handling that a rigid shaft delivers, and there's no articulation to fail mid-procedure. The tradeoff is obvious: no flexibility means no access to tortuous paths, which rules them out for anything beyond a straight or gently curved cavity.
Flexible fiberscopes and videoendoscopes cover the territory rigid scopes can't touch. Gastrointestinal exams, bronchoscopy, and rhinoscopy all depend on a scope that can bend through natural curves without tearing tissue. Video models pull ahead of pure fiberoptic units here because videoendoscopes deliver noticeably better image quality and let the whole surgical team watch and record the procedure, rather than one person squinting through an eyepiece.
Industrial videoscopes are a different animal entirely, built around articulated tips, onboard measurement, and recording meant for asset inspection rather than tissue. They're engineered for pipe interiors, turbine blades, and weld seams, not anatomy, and that shows in their ruggedized housings and longer insertion tubes.
The practical selection rule doesn't change much across either world:
- Start with job geometry: measure the access diameter and depth before anything else.
- Narrow to image and recording requirements next, since documentation needs vary by procedure or inspection type.
- Confirm accessory-channel or instrument compatibility last, once geometry and imaging are settled.
Get the best borescopes for veterinary clinical use narrowed down early, and the rest of the purchase decision moves faster.
Which Specs Actually Determine Performance?
Insertion diameter decides whether the scope enters the port or patient at all. Measure the smallest access point you'll routinely encounter, then work backward. A gastroscope under 9 millimeters with a working length of at least 100 to 125 centimeters covers most canine and feline GI work, but a practice that also sees large-breed dogs or occasional equine cases needs a longer reach in reserve.
Working length matters just as much on the industrial side. A short scope that can't reach the far end of a boiler tube or a long duct run is dead weight, regardless of how sharp its image is.
Pro Tip: Buy for your longest realistic access, not your average one. Renting or borrowing a longer scope for the rare deep case costs less than discovering mid-procedure that yours falls three inches short.
Tip articulation separates scopes that merely fit from scopes that actually work. Degrees of deflection and whether control comes from a joystick or a cable both affect how well the tip negotiates a sharp bend without repeated withdrawal attempts.
Other specs worth checking before you commit:
- Accessory channel diameter, which determines whether forceps, brushes, or suction devices fit through the working channel.
- Sensor type and resolution — CCD and CMOS sensors both work, but resolution below HD shows its limits fast on a monitor larger than a phone screen.
- Recording format and metadata handling, since exportable files with timestamps and labels matter for medical records and CMMS integration alike.
- Environmental and sterilization ratings, including IP-rated housings and chemical compatibility for reprocessing.
For NDT buyers, industrial videoscopes now routinely bundle HD recording, articulation, and measurement functions into a single unit, which shifts borescopy from a qualitative "look and guess" exercise toward something closer to quantitative diagnostics. Learn more about what a videoscope actually offers before comparing models side by side.
How Much Training Does the Team Actually Need?
Flexible endoscopy has a real learning curve, and pretending otherwise is how expensive equipment ends up gathering dust in a supply closet. Hands-on wet labs and repeated continuing-education courses shorten that curve dramatically compared to reading a manual and hoping for the best.
Build competency in this order:
- Practice the slide-by technique on models or cadavers before attempting it on a live patient, since it prevents red-out and reduces tissue abrasion when negotiating flexures.
- Coordinate insufflation control alongside scope advancement rather than treating them as separate skills.
- Run supervised cases with an experienced practitioner present until deflection, withdrawal, and biopsy handling all feel automatic.
- Schedule periodic competency reviews rather than assuming skills learned once will stay sharp without repetition.
Pro Tip: Assign one technician to become the scope specialist early. Splitting training evenly across five people who each use it once a month means nobody actually gets fast at it.
Clinical safety runs deeper than technique alone. Anesthesia coordination, insufflation pressure limits, and infection control between single-use and reusable instruments all need written protocols, not tribal knowledge passed between shifts.
Industrial teams face a parallel obligation. EI 3623:2026 lays out good-practice guidance for remote visual inspection, covering planning, execution, evaluation, and inspector competence management across rigid, flexible, video, and fiber borescopes. Following a documented standard like this protects both the inspection's validity and the inspector's certification record. Additional practical technique advice lives in this guide on using flexible borescopes for accurate diagnostics.
What Cleaning and Maintenance Protocol Keeps a Scope in Service?
Reprocessing a flexible scope follows a strict sequence, and skipping a step is how insertion tubes get damaged or infection risk creeps up. Leak test first, always, before any fluid touches the scope. Manual cleaning removes bioburden, and high-level disinfection or sterilization follows depending on the procedure's classification. Document every cycle, because a missing log entry becomes a real problem during an accreditation review.
Materials compatibility deserves its own checklist line. Not every disinfectant is safe for every insertion tube or optical coating, and using the wrong one can etch lenses or degrade the outer sheath faster than normal wear would.
Routine maintenance items to track on a calendar, not a mental note:
- Light source lamp replacement intervals, since output dims well before a bulb fully fails.
- Insertion-tube inspection for pinholes or kinking after every heavy-use week.
- Connector and cable care, particularly at the handpiece junction where flexing concentrates stress.
- Scheduled service intervals with the manufacturer or an authorized repair center.
Field teams working outside a clinical setting need a slightly different kit. Rugged carrying cases, dust and moisture control, and a small stock of spare parts, like light bulbs and O-rings, cut downtime significantly when a job site has no backup equipment on hand. Facilities managing multiple small drains or temporary plumbing setups around a clinic or lab sometimes find clamping hardware for securing fixtures useful for keeping ancillary equipment stable during extended procedures.
What Should You Ask a Vendor Before You Buy?
A trial run beats a spec sheet every time. Before signing a purchase order, work through this sequence with the vendor directly:
- Ask about service and repair turnaround time in writing, not as a verbal promise during the sales call.
- Confirm what training is included with the purchase and whether follow-up sessions cost extra.
- Check spare-parts availability and typical lead time for common failure points like bulbs and seals.
- Request the warranty terms in full, including what voids coverage during normal reprocessing.
- Run a short wet lab or field trial using the actual scope model, not a demo unit with different specs.
- Test the recording and export workflow specifically, since a scope that captures great video but exports it in an unusable format creates its own headache later.
Total cost of ownership rarely matches the sticker price. Service contracts, consumables, and training all add up over a scope's working life, and a cheaper unit with expensive, hard-to-source parts can cost more within two years than a pricier one with local support.
Before committing, request sample media files from the exact model under consideration, get the service-level agreement in writing, and schedule an in-house competency sign-off so the purchase decision includes the people who'll actually use the equipment daily.
Where Do Borescopes Get Used in Pipe and Access Inspections?
Confined-access inspection is where a well-specified borescope earns its keep, whether the target is an animal's airway or an industrial line. Joint inspection benefits enormously from a scope's ability to see connection points without disassembly, catching gaps or misalignment that external inspection would miss entirely. Blockage assessment, similarly, depends on getting a camera past the obstruction point to characterize what's actually causing the restriction rather than guessing from symptoms alone.
Leak detection scenarios reward articulation and reach in equal measure. A scope with strong tip deflection can trace a suspected failure point along a curved or angled path instead of stopping at the first bend. Corrosion and wear surveys inside metal or composite piping runs need decent illumination and resolution to distinguish surface staining from actual material loss, which is where sensor quality starts mattering more than raw magnification.
These same access challenges appear constantly in veterinary bronchoscopy and rhinoscopy work, where the "pipe" in question is an airway or nasal passage rather than a mechanical line, and in industrial tubing runs, boiler tubes, and structural cavities where physical disassembly isn't practical or affordable. The common thread across both domains is straightforward: a scope has to reach the target, illuminate it well enough to interpret, and ideally record the result for later reference or reporting. Explore the full borescope and endoscope catalog to compare models built for these confined-access jobs.
How Do Plumbing-Style Borescopes Compare to Veterinary and Industrial Scopes?
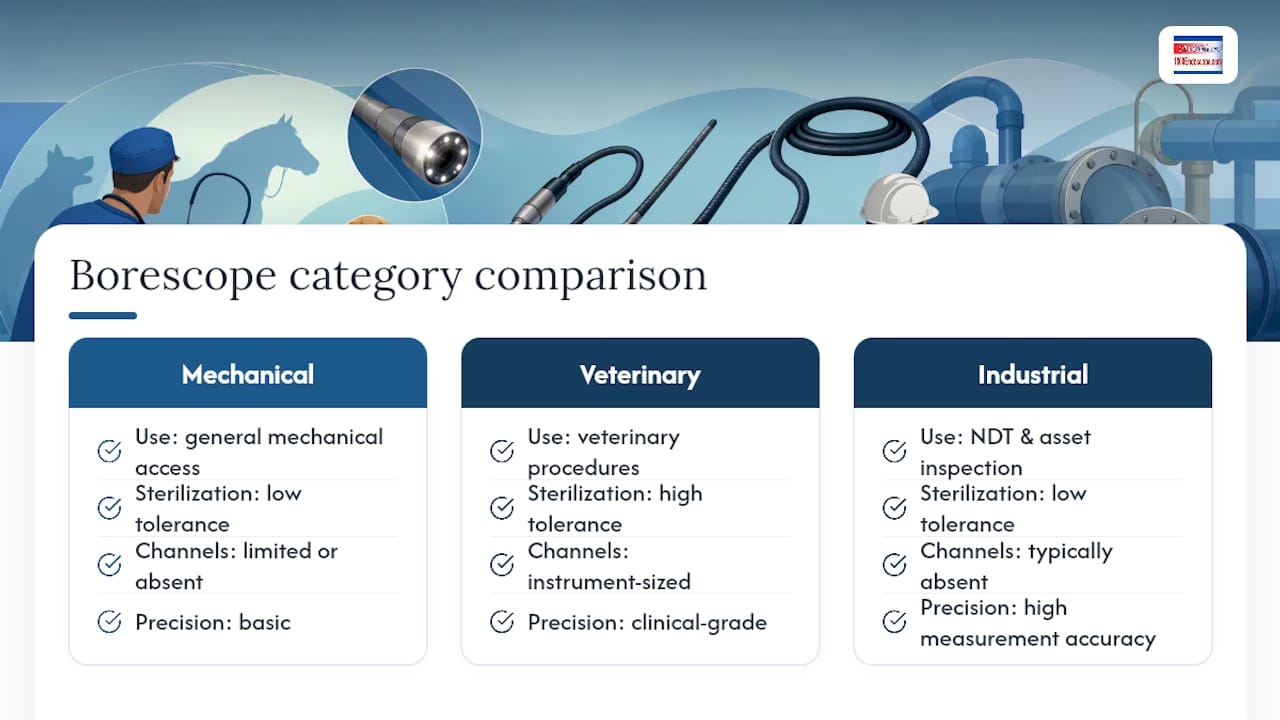
A general-purpose borescope built for tight mechanical access shares more with veterinary and industrial scopes than most buyers expect, and the differences that do exist come down to intended precision rather than basic function. All three categories rely on the same core mechanics: a light source, an image sensor, an insertion tube, and some form of tip control.
Veterinary scopes distinguish themselves through biocompatible materials, sterilization tolerance, and accessory channels sized for forceps, brushes, or biopsy tools. That level of clinical engineering adds cost but is non-negotiable when the scope enters a living patient repeatedly across different cases.
Industrial NDT videoscopes push in a different direction, toward measurement accuracy, articulation range, and recording formats that integrate with maintenance software. Selection criteria for these units typically include diameter, resolution, articulation, explosion-proof compatibility, and CMMS integration, since the output feeds directly into asset-management decisions rather than a single procedure record.
A general mechanical-access borescope sits between the two, usually simpler and more affordable, but lacking the sterilization tolerance a clinic needs or the measurement precision an NDT program requires. For a buyer serving both veterinary and industrial demands, the smarter move is usually two purpose-built scopes rather than one compromise unit trying to do both jobs adequately.
What Goes Wrong Most Often During Inspections?
Poor illumination tops the list of recurring complaints, especially in longer or darker cavities where the built-in light source simply can't throw enough usable brightness to the far end of the insertion tube. Condensation on the lens is the second most common culprit, particularly when a scope moves from a cold storage environment straight into a warm, humid target area, fogging the image within seconds.
Cable and tube damage from repeated flexing shows up as intermittent image dropout or a control response that feels sluggish compared to when the scope was new. Debris and buildup on the tip itself can mimic a real defect on screen, leading an inexperienced operator to misread routine grime as active corrosion or damage.
A few troubleshooting habits solve most of these issues before they derail a procedure or inspection:
- Let the scope acclimate to ambient temperature for a few minutes before insertion in humid or variable-temperature environments.
- Wipe the tip lens clean immediately before each insertion, not just at the end of the session.
- Check cable continuity and articulation response during a quick pre-use test rather than discovering a fault mid-procedure.
- Keep a spare light source or backup unit on hand for field work where a dead bulb can end the job entirely.
Operator inexperience compounds every one of these mechanical issues, since a skilled hand recognizes and works around a dim image or minor fogging, while a novice may misinterpret the result or force the scope into a position that damages it.
How Do You Read What the Scope Actually Shows You?
Interpreting a borescope image comes down to pattern recognition built through repetition, and a few visual cues do most of the diagnostic work. Corrosion typically presents as a rough, pitted, or discolored surface texture that catches light unevenly compared to the smooth, uniform reflection of healthy material nearby. Active corrosion tends to show a reddish or orange cast when metal oxidation is involved, while older, more stable corrosion often appears darker and drier.
Blockages and buildup usually announce themselves through a narrowing field of view or a texture that clearly doesn't match the surrounding surface, whether that's biological material, mineral deposit, or foreign debris. The scope's light will often reflect differently off buildup than off the base material, creating a visible contrast line worth noting in any report.
Structural damage, cracks, joint separation, or deformation, shows up as a break in the expected continuous line of a seam or surface. Following rigorous reporting and dimensional reference standards turns a subjective "that looks bad" observation into a measurable, defensible finding, which matters enormously when a report needs to justify a repair decision or a treatment plan. Pairing visual assessment with a measurement tool, where the scope supports one, converts an estimate into an actual dimension that can be tracked over time or compared against a known reference standard.
Vendor Perspective: Common Client Mistakes and Practical Shortcuts
The mismatch we see most often is diameter and length picked from a spec sheet instead of an actual access measurement, followed closely by teams under-budgeting training and skipping a trial entirely. The fix is almost always the same: pick one versatile videoscope for a mixed caseload, bundle training into the purchase instead of treating it as optional, and confirm spare parts are actually stocked before you need them urgently. Our practical veterinary endoscopy guides cover the caseload side in more depth.
— Endoscope
How Can 1800endoscope Help You Choose the Right System?
The company supplies portable veterinary and industrial endoscopes and accessories suited for a range of access challenges, from small-diameter GI scopes to articulated industrial videoscopes with recording and measurement capability.
If your caseload leans clinical, the fully portable 6mm airway inspection system covers small-animal bronchoscopy and rhinoscopy work at an entry price point that won't strain a smaller practice's equipment budget. Larger practices weighing rigid options for surgical work can browse the veterinary rigid endoscopy catalog directly. For a broader comparison across both veterinary and industrial lines, the full borescope and endoscope catalog is the fastest way to narrow candidates by diameter, length, and recording features.
Before finalizing any order, confirm training and service options directly with our team, since matching the right scope to your access geometry only pays off if your staff can actually operate it with confidence from week one. Reach out to request a demo or ask a compatibility question against your specific procedure list or inspection targets.
Sources
- Endoscopic Equipment for the Veterinary Practitioner | Today's Veterinary Practice
- Clearer views, better data: a CWIS guide to video borescope inspection | AWS Inspection Trends (May 2026)
- Borescopy: Remote Visual Inspection in NDT and Assets
- EI 3623:2026 - Remote visual inspection: Good practice guidance – visual inspection with borescopes Volume one
- A deeper look into endoscopy | Veterinary Practice News