
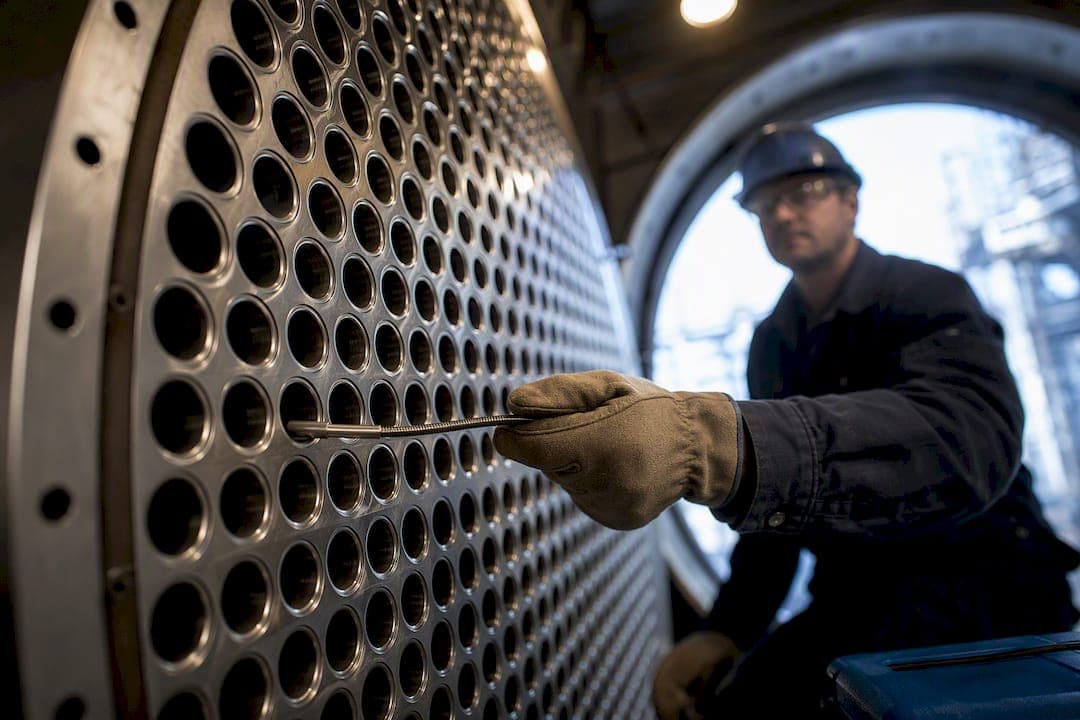
Borescopes give inspectors direct visual proof of what's happening inside heat exchanger tubes, catching fouling, leaks, blockage, and physical damage without pulling the bundle. They work best alongside eddy-current testing, which finds the subsurface flaws a camera can't see. Before renting or buying, check three things: probe diameter against your smallest tube ID, probe durability under heat and repeated use, and whether the unit records and exports documentation your reporting workflow actually needs.
TL;DR:
- Borescopes are best paired with eddy-current testing since cameras only reveal surface issues, not wall thickness or subsurface flaws.
- Matching probe diameter to the smallest tube ID and ensuring probe durability are essential for effective inspections in varying tube sizes and heat conditions.
- Proper mapping, labeling, and standardized capture techniques are vital; skipping these can undermine the usefulness of visual inspection documentation.
- Combining visual scans with electromagnetic testing on flagged tubes reduces inspection time and improves defect detection accuracy.
- Equipment purchase decisions should prioritize workflow compatibility, probe fit, articulation, and durability over just resolution or features.
Table of Contents
- What Does a Heat Exchanger Borescope Actually Show You?
- Probe Diameters, Articulation, and Durability Specs That Actually Matter
- The Field Workflow for Tube and Bundle Inspection
- Visual Inspection vs. Eddy Current: When to Use Each
- How to Choose a Borescope for Heat Exchanger Work
- Getting the Most Out of a Demo or Rental Unit
- Field Maintenance and Practical Tips for Reliable Inspections
- Safety Precautions and Best Practices for Tube Inspections
- Maintenance and Cleaning Procedures for Your Borescope
- What the Data Doesn't Tell You About Borescope Inspections
- Get the Right Probe for Your Next Bundle
- Sources
- FAQ
What Does a Heat Exchanger Borescope Actually Show You?
A borescope or videoscope threaded into a tube gives you a direct look at conditions that would otherwise stay hidden until failure. Borescopes are widely used to visually inspect tubes for fouling, debris, leaks, and physical damage, and that visual record often settles arguments that would otherwise drag on between operations and engineering.
What a camera pass reliably catches:
- Scale buildup, sludge, and biological fouling along the tube wall
- Active leaks at tube ends or rolled joints
- Debris, sediment, or foreign objects partially blocking flow
- Cracked, corroded, or deformed tube-end conditions
- Baffle damage or misalignment visible from tube openings
What it can't tell you is how much metal is left. A borescope shows surface condition, not wall thickness, so a tube that looks clean on camera can still be dangerously thin. That's a real limitation, not a flaw in the tool. It just means visual inspection answers a different question than eddy-current testing does, and conflating the two is where a lot of inspection programs go wrong.
The deliverable that matters for the client file is a clean documentation package: timestamped video, still photos of anything abnormal, and an annotated tubesheet image showing exactly which tube number produced which finding. Without that mapping, a video full of tube interiors is nearly useless six months later when someone asks which tube leaked.
Probe Diameters, Articulation, and Durability Specs That Actually Matter
Tube inside diameters in shell-and-tube exchangers vary enough that no single probe fits every job. A probe that's a comfortable fit in a 1-inch condenser tube will bind, stall, or scratch its way through a smaller feedwater heater tube, so matching probe diameter to your tightest access point is the first filter, not an afterthought.
Rigid borescopes work fine for short, straight runs where you can see the far end from the tube entrance. Once the tube run has any length or the access geometry curves, semi-rigid or fully articulating flexible probes take over, because they can be steered around bends without stopping at the first obstruction. Articulation matters more than most buyers expect: a probe that only bends in one plane will miss defects sitting just past a curve.
Pro Tip: Bring two probe diameters to every job if the bundle mixes tube sizes. Showing up with only your standard probe means walking away from the smaller tubes entirely.
Beyond the core probe, a few accessories change what you can actually confirm on site:
- Distance-to-target and scale overlays for rough sizing of a defect without pulling a separate measurement tool
- Retrieval hooks or magnetic tips for pulling loose debris
- Side-view mirror attachments for inspecting tube-end welds
On durability, not all "high-definition" claims are equal; optics quality, probe cabling toughness, and a real IP rating matter more for repeat field use than a headline resolution number. Look for IP67 or better sealing, stated temperature limits for the probe tip, and a cable jacket that resists abrasion from repeated insertion. A probe that can't survive a season of tube-by-tube work is a bad deal even at a bargain price.
The Field Workflow for Tube and Bundle Inspection
A borescope pass on a large bundle is only as good as the coverage discipline behind it. Skipping the mapping step is how "we inspected the heat exchanger" quietly becomes "we inspected most of it."
- Prep the access points. Confirm lockout/permitting is complete, then clean and, where required, temporarily seal tube ends so debris from adjacent tubes doesn't contaminate the one you're inspecting.
- Map and number every tube before you start. Tube-mapping software like TubePro enforces full coverage on bundles running into the thousands of tubes, where manual tally sheets are where inspections quietly lose track of what's been checked.
- Standardize the capture technique. Keep lighting consistent, hold focus distance steady near suspected defects, and use uniform file naming with a timestamp baked into every clip so a reviewer can match footage to a tube number months later.
- Close out with annotation and export. Tag abnormal frames, export the tubesheet image set, and merge the visual findings with any eddy-current data before the report goes out the door.
That last step is where a lot of otherwise solid inspections fall apart. A folder of unlabeled video clips handed off separately from the eddy-current spreadsheet forces the client's engineer to reconstruct your workflow after the fact, which is exactly the job your report was supposed to do for them.
Visual Inspection vs. Eddy Current: When to Use Each
Borescopes and eddy-current testing aren't competing methods. They answer different questions about the same tube.
- Visual inspection confirms fouling, deposits, visible leaks, and surface-level damage you can see with your own eyes on a screen.
- Eddy-current testing finds what a camera physically cannot: wall thinning, pitting under a fouling layer, and cracks that haven't yet broken the surface.
- Combined workflow: run the borescope first to triage the bundle quickly, then send eddy-current probes into tubes flagged during the visual pass, or into a representative sample when the full bundle is too large to test every tube electromagnetically.
Eddy current testing is the fastest and most efficient method for detecting subsurface defects in non-ferrous tubing, which is exactly why pairing it with a visual scan beats running either method alone. Video inspection can flag foreign objects and fouling in minutes, but it cannot quantify wall loss, so treat a clean-looking tube on camera as inconclusive rather than passed if wall thinning is a real risk for that service.
Tube-mapping software is what actually ties the two datasets together. Log both visual findings and eddy-current results against the same numbered tube map, and you get one tubesheet record instead of two reports someone has to reconcile by hand later.
How to Choose a Borescope for Heat Exchanger Work
Buying or renting equipment for tube inspection comes down to matching the unit to your actual access constraints, not to whatever spec sheet reads most impressively.
- Probe diameter and length: confirm the smallest tube ID in your fleet, then check the probe fits with clearance to spare, not a tight squeeze.
- Articulation range and controls: test whether the joystick or control head lets you steer around a bend one-handed, since most inspections happen in awkward positions.
- Recording and documentation: native onboard recording, automatic timestamping, and measurement overlays save real time versus a camera that only streams live with no capture option.
- Export format compatibility: confirm the unit exports files your reporting software or client deliverable format actually accepts.
- Durability ratings: IP67 or higher sealing and a stated temperature ceiling for the probe tip, since ambient heat inside a recently shut-down exchanger can exceed what a consumer-grade unit tolerates.
- Replaceable probe elements: ask whether damaged tips or cables can be swapped in the field, because a unit that requires a full return-to-factory repair kills productivity on a live outage.
- Mapping software compatibility: check whether the unit exports image sets that plug into tubesheet mapping tools, or at minimum produces file names and folder structures a mapping workflow can ingest without manual renaming.
Consumer-grade features like wireless streaming and a decent sensor are worth having, but they're conveniences. The five items above are the ones that determine whether the equipment actually works on your bundle.
Getting the Most Out of a Demo or Rental Unit
Vendors routinely offer demo units and short-term rentals, and that's the cheapest way to find out whether a borescope actually works on your bundle before you commit budget to it.
- Request a demo probe sized to your smallest tube ID, not the vendor's default demo unit, since validating fit on your tightest access point is the whole point of a trial.
- Ask for a recorded sample from a comparable tube, ideally similar material and fouling condition, so you can judge image clarity under real working distance rather than a marketing clip shot in ideal lighting.
- Test integration with your reporting workflow during the trial, exporting a sample file the way you would on a live job, before deciding rental or purchase makes more sense for your inspection frequency.
Rental tends to make more financial sense for infrequent outages or a single large bundle job; owning the equipment pays off once you're running inspections often enough that downtime waiting on a rental shipment starts costing more than the unit itself.
Field Maintenance and Practical Tips for Reliable Inspections
Small habits protect probe life and inspection accuracy more than any spec sheet does.
- Clean the lens and probe tip after every tube, not just at end of shift, since dried fouling residue scratches optics on the next insertion.
- Avoid forcing a probe around a tight bend; a stalled probe under continued push force is how cables kink and fail mid-job.
- Run a quick function check before each round: focus, lighting, and recording status, so a dead battery doesn't turn into a missed tube later in the report.
- Keep a consistent focus distance near suspected defects to avoid false positives caused by blur that looks like pitting on a low-quality frame.
Pro Tip: If a tube shows anything ambiguous on camera, don't try to resolve it with a second camera pass. Flag it for eddy-current follow-up instead. A visual recheck rarely settles a subsurface question a camera was never built to answer.
Watch for red flags that should always trigger further NDT: any visible wall deformation, unexplained discoloration suggesting internal corrosion, or a leak path with no obvious external cause. Those findings belong in the eddy-current queue, not a "monitor next outage" note.
Safety Precautions and Best Practices for Tube Inspections
Heat exchanger inspections happen in confined, often hazardous conditions, and the borescope itself is the least risky part of the job if the surrounding controls are solid.
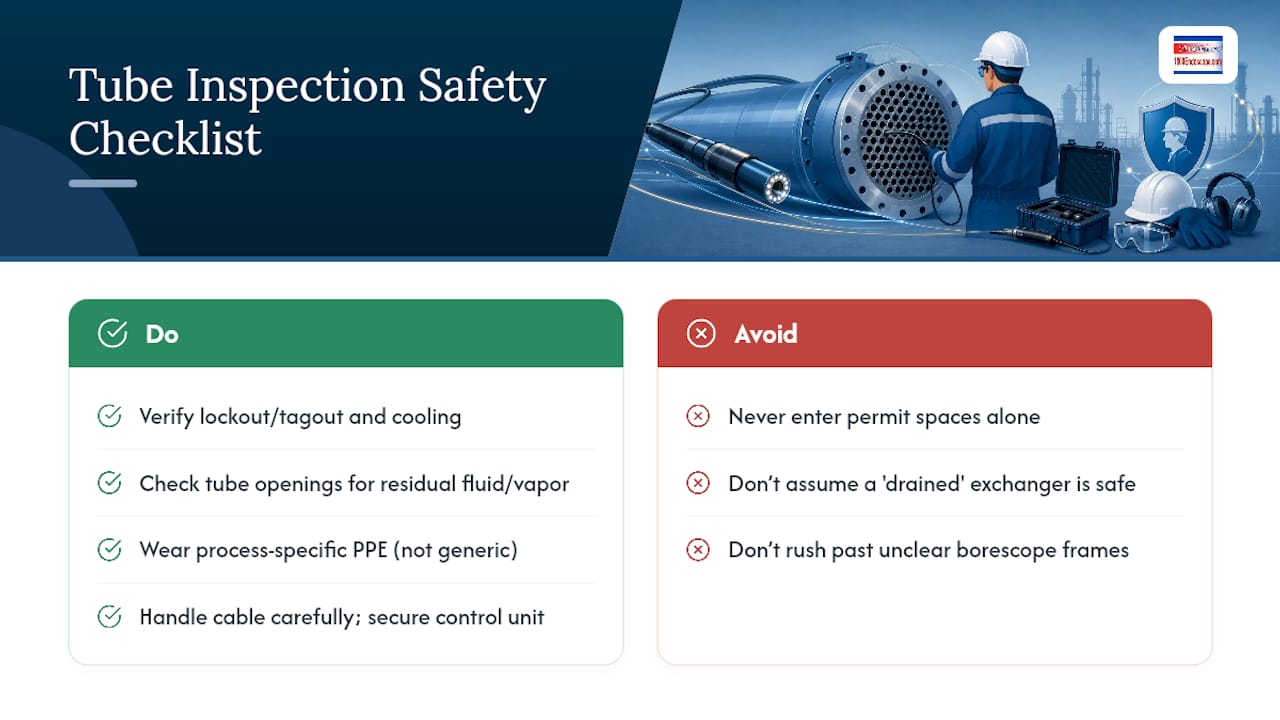
Confirm lockout/tagout is verified and the exchanger has cooled to a safe handling temperature before any probe goes near a tube end. Residual heat inside a recently shut-down unit can exceed both your comfort and the probe's rated temperature limit, damaging equipment and risking burns. Check for residual process fluid or vapor at tube openings, since even a "drained" exchanger can hold pockets of hazardous material in low points.
Wear appropriate PPE for the process fluid involved, not just generic gloves and glasses. Confirm ventilation is adequate if you're working inside a confined space to access tube ends, and never work alone on a permit-required confined space entry regardless of how routine the inspection feels.
Handle the probe cable with care around tube edges. Sharp tube-end burrs can nick the sheathing, and a damaged cable jacket is both a repair cost and a potential shock or moisture-ingress hazard on the next job. Keep the control unit and monitor secured on a stable surface, especially when working from a ladder or platform near the tubesheet, so a dropped unit doesn't become a second incident on top of the inspection itself.
Finally, treat every "unclear" reading as a stop point rather than a guess. Rushing past an ambiguous frame to keep pace with a tube count is how real defects get logged as passed.
Maintenance and Cleaning Procedures for Your Borescope
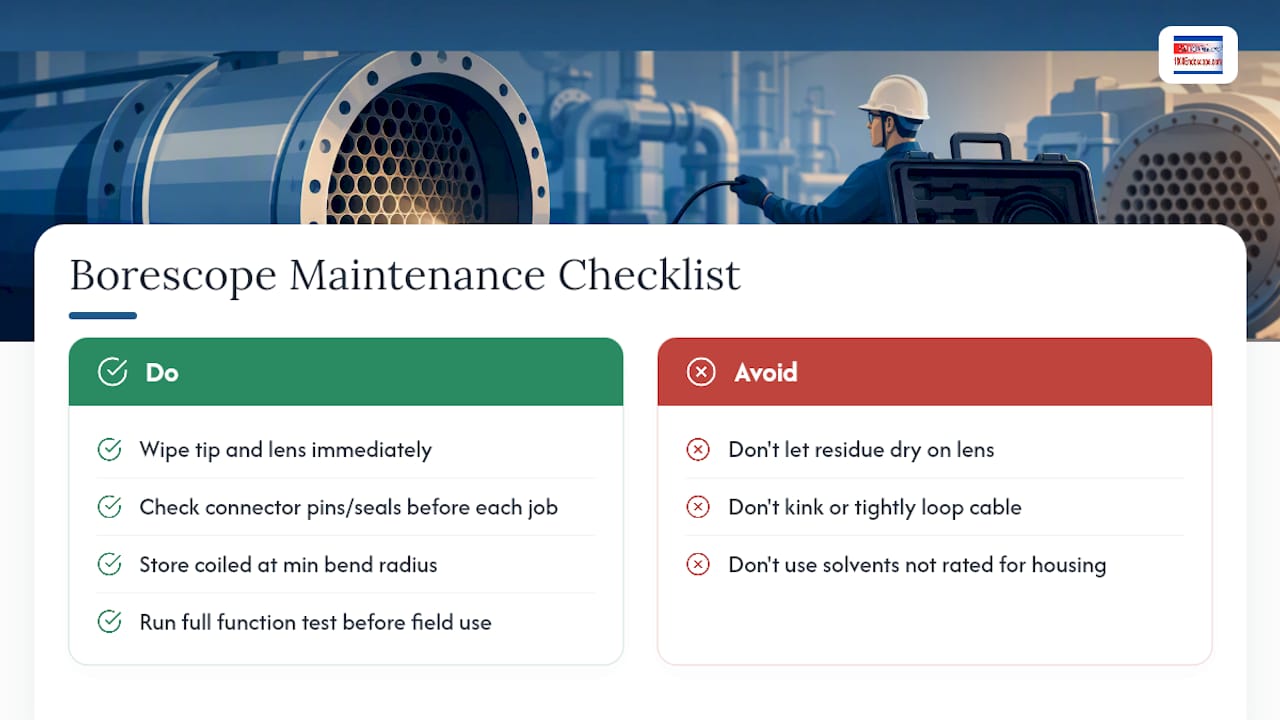
A borescope that's been dragged through fouled tubes all day needs the same discipline you'd apply to any precision instrument, and skipping it shortens equipment life fast.
Wipe the probe tip and lens with a manufacturer-approved cleaning cloth immediately after use, before residue dries and hardens. Dried scale or oil films are far harder to remove without scratching the lens coating than fresh residue wiped off on the spot. Avoid solvents that aren't rated for the probe's housing material; some cleaning agents that are perfectly safe on metal fittings will degrade rubberized cable jackets over time.
Store the probe coiled at the manufacturer's minimum bend radius, never kinked or looped tightly, since repeated sharp bends during storage stress the internal fiber or camera wiring long before they show visible damage. Check connector pins and seals for corrosion or moisture before each job, particularly if the unit has been stored in a humid plant environment between inspections.
Run a full function test, focus, lighting, articulation, and recording, before heading to the field rather than discovering a dead channel once you're already at the tubesheet. Reviewing operation and cleaning procedure videos periodically helps catch habits that quietly shorten probe life, especially for less experienced technicians rotating onto inspection duty.
What the Data Doesn't Tell You About Borescope Inspections
Most equipment guides sell resolution and frame rate as the deciding factors in a borescope purchase. That's backwards for heat exchanger work. The inspections that go sideways aren't the ones running lower-megapixel cameras. They're the ones where nobody mapped the tube bundle before starting, so half the "inspected" tubes turn out to be a guess about which number they were.
The industry's quiet blind spot is treating visual inspection as a pass/fail test rather than a triage tool. A clean-looking tube on camera gets logged as "okay" far too often when it should have been flagged for eddy-current confirmation, because the fouling that would have hidden early wall thinning simply wasn't there yet to hide it. Combining a visual scan with targeted electromagnetic testing on flagged tubes cuts total inspection time without giving up detection capability on either surface or subsurface defects, and that combined approach deserves more attention than it gets in most maintenance planning documents.
Equipment specs matter, but they're the second decision, not the first. Get the workflow and the mapping discipline right, and a mid-tier probe will outperform a premium unit run without either.
— Endoscope
Get the Right Probe for Your Next Bundle
Inspection quality starts with a probe that actually fits the tube in front of you, and 1800endoscope's borescope and endoscope catalog is built around that exact constraint rather than a one-size-fits-most default. The PVSM6150, a fully portable 6mm videoscope with direct monitor viewing and SD card recording, is a practical example of a demo-capable unit sized for tight tube access and small-ID feedwater or condenser work.

Before requesting a demo or rental quote, gather your smallest tube ID, a few photos of the access points you'll be working through, and any known constraints on tube length or bend radius. That gives 1800endoscope's team what they need to recommend a probe diameter that actually matches your bundle instead of guessing from a catalog listing.
If you're planning an upcoming outage, reach out to request a demo unit or download the full catalog now, so you have the right probe in hand before the tubesheet comes off.
Sources
For further reading on equipment selection and workflow integration, the Digital Camera World borescope buying guide covers optics and durability tradeoffs, while Eddyfi's TubePro product page details tube-mapping software built for large bundles.
- The best borescopes and inspection cameras | Digital Camera World
- TubePro - Heat exchanger and tubing inspection software | Eddyfi
- ETi-300 eddy current tube inspection instrument | Ether NDE
FAQ
How Do You Inspect a Heat Exchanger?
Inspectors typically run a borescope through tube ends to visually check for fouling, leaks, and damage, then follow up with eddy-current testing on flagged or sampled tubes to check for wall thinning and subsurface cracks.
What's the Difference Between an Endoscope and a Borescope?
Both use a flexible or rigid probe with a camera to see inside inaccessible spaces; "endoscope" is the broader medical and veterinary term, while "borescope" specifically describes the industrial version used for mechanical and structural inspection.
What Is the 10-13 Rule for Heat Exchangers?
Definitions of this rule vary by industry and organization, and there's no single standardized version confirmed across sources, so check with your plant's specific inspection standard or NDT provider rather than assuming a universal figure.
What Are the Two Main Types of Borescopes?
Rigid borescopes work for short, straight-line access, while flexible borescopes (including articulating videoscopes) bend around obstructions and curves, making them the standard choice for most heat exchanger tube runs.
Can a Borescope Detect Wall Thinning in a Tube?
No. A borescope shows surface condition and visible defects, but it cannot measure remaining wall thickness, which requires eddy-current or another electromagnetic NDT method.